Capture SDK Guide
The purpose of the Integration Guide is to give developers everything they need to set up and work with a minimally viable application using the Capture SDK.
Introduction
The CaptureSDK is targeted to developers who want to use IDEMIA technologies within their mobile apps.
The main features are:
- Biometric captures
- Biometric coding
- Fingerprint capture and matching
- Biometric authentication and identification
- Identity documents reading
Adding the SDK to your project
Gradle
Configure repository:
XML1buildscript {2 repositories {3 maven {4 url "$repositoryUrlMI"5 credentials {6 username "$artifactoryUserMI"7 password "$artifactoryPasswordMI"8 }9 }10 ...11 }12 ...13}
repositoryUrlMI: Mobile Identity artifactory repository url
artifactoryUserMI: Mobile Identity artifactory username
artifactoryPasswordMI: Mobile Identity artifactory password
These properties can be obtained through Experience Portal(My Identity Proofing -> Access) and should be stored in local gradle.properties file. In such case credentials will not be included in source code. Configuration of properties:
XML1artifactoryUserMI=artifactory_user2artifactoryPasswordMI=artifactory_credentials3repositoryUrlMI=https://mi-artifactory.otlabs.fr/artifactory/smartsdk-android-local
More about gradle properties can be found here.
For biometric features the dependency is:
Groovy1implementation("morpho.mph_bio_sdk.android:SmartBio:version")
For document features the dependency is:
Groovy1implementation("morpho.mph_bio_sdk.android:SmartDoc:version")
For all features the dependency is:
Groovy1implementation("morpho.mph_bio_sdk.android:SmartSDK:version")
Version: artifact version
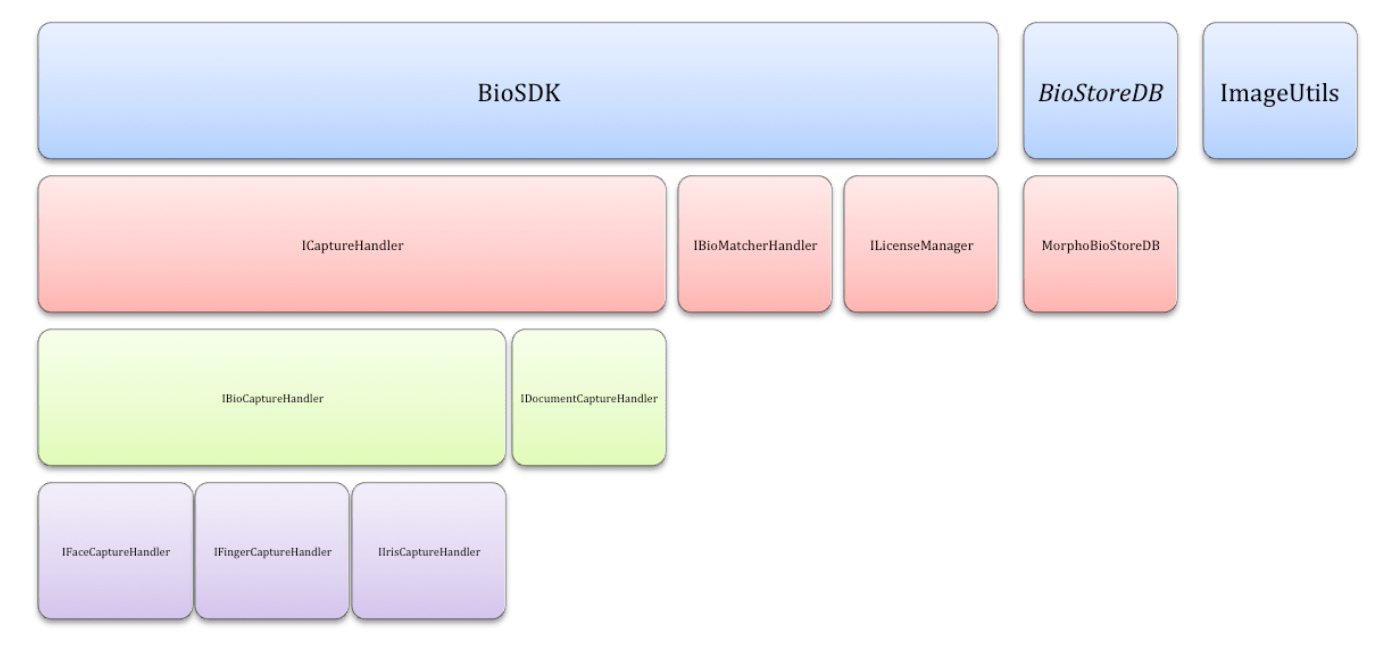
Components
The SDK comprises five distinct components:
- BioCaptureHandler: Handles the capture of the biometrics through the camera of the device.
- BioMatcherHandler: Handles the biometric coding and matching.
- DocumentCaptureHandler (see: DocumentCaptureHandler): Handles the document reading features (like reading MRZ documents).
- BioStoreDB: Repository to store biometric templates. (This component is optional, in case you don't want to implement your own database.)
- ImageUtils: Handles the image format conversion, in case the integrator must change the image format or import an image.
- LicenseManager: Handles the license management. Refer to License Manager for more details.
Access to BioCaptureHandler, BioMatcherHandler and DocumentCaptureHandler is through the
Biometric Capture SDK entry points.
Design considerations
-
User permissions must be handled by the integrator. You must check that the app permissions are granted by the user if the Android version is higher than 23 (as detailed here).
-
Remember: You must always have a valid license before using any method of this SDK. You can activate it through
LicenseManager. Refer to License Manager for more details. -
Note: If your app is to run in low memory devices, you must add
android:largeHeap="true"to your application. -
If you find that your project requires other native libraries, you must add in your gradle.properties file the following filter:
XML1android.useDeprecatedNdk=true
And in your build.gradle add filters for the desired ABI. For now, the SDK supports armeabi-v7a and arm64-v8a:
XML1defaultConfig {2 ....3 ndk.abiFilters 'armeabi-v7a','arm64-v8a'4 }
Prerequisites
Skills required
The integration tasks should be done by developers with knowledge of:
- Android Studio
- Java for Android
- Android OS
Resources required
Integration may be performed on computers running Windows, Linux, or macOS.
The tools required are:
- Android Studio
- Android SDK tools: preferred latest version
- JDK: preferred latest version
- Android device (emulator is not supported)
- Minimum SDK version is 21
Biometric capture SDK structure
The SDK's structure is displayed below.
Tips
App size optimization
After adding the SDK to your project you will observe that the size of application has grown significantly. This is because the SDK now includes native libraries for two ABIs: armeabi-v7a and arm64-v8a. What is generated is an .apk file that deploys to Google Play. Your application will contain both application binary interfaces even if one is not used.
Android App Bundle is the solution for this issue. Instead of generating an .apk, it is possible to generate a bundle (.aab). When a user installs the application from the store that contains the bundle, only the required components for the user's specific device will be downloaded.
Additionally, the maximum size of the bundle increases to 150 MB (100 MB is still maximum size for .apk files).
No changes on Google Play are required - just upload .aab instead of .apk. Also, no development in the application project is required.
It is recommended that the bundle options be declared inside the Gradle file, for example:
XML1android {2 ...3 bundle {4 density {5 enableSplit true6 }7 abi {8 enableSplit true9 }10 language {11 enableSplit false12 }13 }14}
More about app bundles can be found here.
License manager
The purpose of this section is to show the API of the license management portion of the SDK, and expose the objects involved.
License manager
The License manager is the main entry point to use the SDK. You can manage licenses through LicenseManager.
Note: A valid license is required before using any feature of the SDK.
provideLicenseManager
This method provides an instance of LicenseManager with a predefined LKMS profile. Operation with LicenseManager should be executed before starting capture.
Kotlin1LicenseManager manager = LicenseManager . provideLicenseManager (LkmsProfileId, LkmsApiKey, lkmsUrl)
Activating license
This function takes care of making sure a valid license is stored on the device. This process is crucial and must occur each time before any SDK usage. In most cases it does not require any effort from integrator side. However, it might fail in some corner cases that are listed below.
Method handles license management on calling thread.
Callback solution:
Kotlin1val activationResult = manager.activate(2 object : LicenseActivationListener {3 override fun onLicenseActivated() {4 //License fetched and activated with success.5 }67 override fun onLicenseActivationFailed(licenseActivationError: LicenseActivationError) {8 //Failed to fetch or activate the license.9 }10 }, applicationContext)
Coroutines solution: It returns LicenseActivationResult
Kotlin1val activationResult = manager.activate(applicationContext)2when (activationResult) {3 is LicenseActivationSuccess -> {4 //License fetched and activated with success.5 }6 is LicenseActivationError -> {7 //Failed to fetch or activate the license.8 }9}
LicenseActivationResult
This is information of result from activation license using coroutines solution. Instance might be type of:
- LicenseActivationSuccess
- LicenseActivationError
LicenseActivationError
This is the information about why license can not be activated.
Attribute | Description |
|---|---|
| type ActivationErrorType | The type of error why license activation failed |
| message String | The activation failure reason. |
ActivationErrorType
Attribute | Description |
|---|---|
PROFILE_EXPIRED | Profile expired, all licenses won’t work anymore. (Contact with support) |
ACTIVATION_COUNT_EXCEEDED | No more licenses can be consumed. (Contact with support) |
AUTHENTICATION_ISSUE | Credentials and/or profile information are wrong. |
CONNECTION_ISSUE | Connection issue. Make sure that your internet connection is stable. |
UNKNOWN | Unknown issue. |
Getting started
This guide illustrates the required steps to configure a minimally viable project for capturing biometrics using the Biometric Capture SDK.
Downloadable sample apps are here:
Creating your app
- Add the SDK library to your app's
build.gradle:
Groovy1implementation("morpho.mph_bio_sdk.android:SmartBio:version")
If you do not have configured repository for the SDK yet, see introduction that explains how to do that.
- Add the correct plugin dependency if you use face capture.
Plugins are special extensions to the SDK that might add or change its features. In this way, users can save memory and increase performance by picking plugins they need.
For face capture there are three plugins to choose from. There should be only one plugin selected during the build. If more than one for a
specific flavor is selected, it will cause a MultipleFaceInitPluginsException.
Available plugins
-
plugin-face-normal should be used when WebBioServer is not used and there is need for strong security during local liveness challenges.
-
plugin-face-lite should be used when WebBioServer is used because it can reduce the size of an application significantly.
-
plugin-face-cr2dmatching should be used for local usage with additional security feature for
FaceLiveness.ACTIVE mode.
Example plugin dependency for face capture:
Groovy1implementation 'com.idemia.smartsdk:plugin-face-normal:version'
Plugins for face matching
If you use the finger only variant you can skip this section because the proper plugin is already attached to that version.
For face matching there are three options to choose from. Keep in mind that these algorithms are not compatible.
Stored templates will not be successfully matched against templates from another algorithm.
-
plugin-algorithm-f5-4-low75: This has been improved to perform better with default compression. If a previous SDK has been used before and there is a user base with stored templates already, then full migration will be required. All templates must be generated again with the new plugin in use.
-
plugin-algorithm-f5-0-vid81: This is the default algorithm that is compatible with previous SDK versions.
-
plugin-algorithm-fingerv9: This provides only finger matching.
-
plugin-algorithm-f6-5-low70: Recommended algorithm for face matching, introduced in SDK version 4.44.0. There is no compatibility in the template level with other plugins.
Remember to attach only one matching plugin per flavor, otherwise a MultipleInitBlockPluginsException will occur.
- Add the
CaptureViewto the layout where you handle the biometric capture:
XML1<com.idemia.smartsdk.preview.CaptureView2 android:id="@+id/captureView"3 android:layout_width="match_parent"4 android:layout_height="match_parent" />
- On your activity or fragment get a reference to this view:
Java1CaptureView cameraPreview = (CaptureView) findViewById(R.id.captureView);
- Activate your license. This can be done in the
onCreate(Bundle savedInstanceState)or in a previous stage of your app. This must be done only once.
Java1LicenseManager manager = LicenseManager.provideLicenseManager(LkmsProfileId, LkmsApiKey, lkmsUrl)2 val activationResult = manager.activate(applicationContext)3 when(activationResult) {4 is LicenseActivationSuccess -> {5 //License fetched and activated with success.6 }7 is LicenseActivationError -> {8 //Failed to fetch or activate the license.9 }10 }
For security reasons it is good to consider storing LKMS credentials outside source code (for example gradle properties).
- Prepare capture settings. For face capture, you should use
FaceCaptureOptions.
Java1FaceCaptureOptions captureOptions = new FaceCaptureOptions(FaceLiveness.PASSIVE);2 captureOptions.setCamera(Camera.FRONT);3 captureOptions.setCaptureTimeout(120);4 captureOptions.setOverlay(Overlay.OFF);
- In the
onResume()method of your activity or fragment, obtain a valid reference to theIBioCaptureHandlerusing the previously created capture options.
Java1protected void onResume() {2 //Create handler3 BioSdk.createFaceCaptureHandler(this, captureOptions, new MscAsyncCallbacks<IFaceCaptureHandler>() {4 @Override5 public void onPreExecute() {6 // Optional hook on the builtin Android AsyncTask callback `onPreExecute`7 }8 @Override9 public void onSuccess(IFaceCaptureHandler result) {10 // Indicates that initialization succeeded, the returned handler can be used to start the capture.11 faceCaptureHandler = result;12 }13 @Override14 public void onError(BioCaptureHandlerError e) {15 // An error has occurred during the initialization16 }17 });18 super.onResume();19}
- Add the listeners for the events to the handler:
Java1faceCaptureHandler.setFaceCaptureResultListener(new FaceCaptureResultListener() {2 @Override3 public void onCaptureSuccess (@NotNull FaceImage image){4 //Successfully captured image5 }67 @Override8 public void onCaptureFailure (@NotNull CaptureError captureError,9 @NotNull IBiometricInfo biometricInfo,10 @NotNull Bundle extraInfo){11 //Capture failure12 );13 }14 });15faceCaptureHandler.setFaceCaptureFeedbackListener(new FaceCaptureFeedbackListener() {16 @Override17 public void onCaptureInfo(FaceCaptureInfo captureInfo) {18 //Face capture feedback info, like move your face to the right19 }20 });21faceCaptureHandler.setFaceTrackingListener(new FaceCaptureTrackingListener() {22 @Override23 public void onTracking(List<FaceTracking> trackingInfo) {24 //Tracking info to know where the face is.25 }26 });
- Initialize the preview and capture to start receiving events. It should happen after creating the capture handler. The most common place
for this would be
onResume:
1faceCaptureHandler.startPreview(new PreviewStatusListener() {2 @Override3 public void onStarted() {4 try {5 captureHandler.startCapture();6 } catch (MSCException e) {7 // handle exception8 }9 }1011 @Override12 public void onError(PreviewError error) {13 // Preview initialization failed and can not be started14 }15 });
- Destroy the handler when
onPause()is invoked:
Java1@Override2 protected void onPause() {3 if (captureHandler!=null) {4 faceCaptureHandler.stopCapture();5 faceCaptureHandler.stopPreview();6 faceCaptureHandler.destroy();7 }8 super.onPause();9 }
- In your manifest, you must add:
XML1<!--Declare new permissions-->2 <permission3 android:name="your.new.permission.NEW_READ_MPH_BIO_SDK_PROVIDER"4 android:protectionLevel="signature" /> <!--unless otherwise required, set the maximum security permission -->5 <permission6 android:name="your.new.permission.NEW_WRITE_MPH_BIO_SDK_PROVIDER"7 android:protectionLevel="signature" /> <!--unless otherwise required, set the maximum security permission -->
XML1<!--The provider must be defined by the implementing app so as to allow multiple apps-->2 <!--Bio store provider provider-->3 <provider4 android:name="com.morpho.mph_bio_sdk.android.sdk.content_provider.BioStoreProvider"5 android:authorities="your.new.authority"6 android:readPermission="your.new.permission.NEW_READ_MPH_BIO_SDK_PROVIDER"7 android:writePermission="your.new.permission.NEW_WRITE_MPH_BIO_SDK_PROVIDER"8 tools:replace="android:authorities, android:readPermission, android:writePermission">9 </provider>
Analytics
Capture SDK offers a logging mechanism that collects analytics data about SDK usage, and sends this data to IDEMIA's server. This data helps IDEMIA to improve Capture SDK and the likelihood of integrator success within the app. It is strongly recommended to activate the analytics mechanism.
- You can enable or disable sending analytics data.
- You can choose to send analytics data only when you are connected to a Wi-Fi network, so as not to not use your cellular connection.
- Analytics data that IDEMIA collects contains only technical data.
- No sensitive personal data is collected.
- IDEMIA does not collect any images.
Analytics data that we collect include following information:
- Application name, bundle id, version
- Capture SDK and RemoteLogger libraries versions
- Device model and operating system version
- Technical information about performed face, finger, and document capture (such as: capture mode used; timestamp; reason of error; time needed to perform a capture; quality of captured image; and light condition)
- Technical information about performed authentication and identification events (such as: used threshold, duration, and obtained score)
- Other technical information (such as: image compression, occurred errors, and SDK performance) that does not contain personal data
You can disable analytics reporting using the appropriate SDK method.
Capture SDK plugins
Plugins have been introduced to give even more flexibility than variants of the SDK. Every integrator might have different needs and size requirements. A new plugin mechanism allows for greater flexibility. Plugins are split to two groups: feature and algorithm.
Feature plugins
Provides various SDK functionalities such as: face capture, document capture, and optical character recognition (OCR).
Algorithm plugins
Provides for extracting biometric data from images, matching this data, and storing it as templates.
How it works
Capture SDK still has previous variants with predefined plugins in the dependency list that are still required. However, some features might be different, like the matching algorithm or face capture challenge behavior. In such cases, these features might be configured via adding specific plugins.
All that must be done to add a plugin is to put the proper dependency to a project's module that will be using the plugin (How to use them).
Benefits
The obvious benefit is reducing the number of SDK variants which makes it easier to pick the proper SDK dependency. It also brings flexibility to the product, namely, the ability to mix or replace features in the future or even extend SDK possibilities by implementing your own plugins.
How to use them
Plugins are just ordinary dependencies. All that must be done is to add the proper dependency for the plugins that are needed. Read carefully about allowed combinations and predefined plugins in SDK variants.
Here is a snippet with all available plugins:
Gradle1//Feature plugins2implementation 'com.idemia.smartsdk:plugin-finger:$version'3implementation 'com.idemia.smartsdk:plugin-face:$version'4implementation 'com.idemia.smartsdk:plugin-face-normal:$version'5implementation 'com.idemia.smartsdk:plugin-face-lite:$version'6implementation 'com.idemia.smartsdk:plugin-face-cr2dmatching:$version'7implementation 'com.idemia.smartsdk:plugin-face:$version'8implementation 'com.idemia.smartsdk:plugin-improved-pdf417-detection:$version'910//Algorithm plugins11implementation 'com.idemia.smartsdk:plugin-algorithm-f5-0-vid81:$version'12implementation 'com.idemia.smartsdk:plugin-algorithm-f5-4-low75:$version'13implementation 'com.idemia.smartsdk:plugin-algorithm-f6-0-idd80:$version'14implementation 'com.idemia.smartsdk:plugin-algorithm-f6-5-low70:$version'15implementation 'com.idemia.smartsdk:plugin-algorithm-fingerv9:$version'
Allowed combinations
Here are all possible combinations of plugins for specific use cases.
As mentioned above, the SDK variants have predefined plugins dependency, so that only a few must be defined.
See what predefined plugins has which variant of the SDK you use.
Face capture |
|---|
| plugin-face |
| plugin-face-lite |
| plugin-face-normal |
| plugin-face-cr2dmatching |
| Available algorithm plugins |
| plugin-algorithm-f5-4-low75 |
| plugin-algorithm-f5-0-vid81 |
| plugin-algorithm-f6-5-low70 |
| plugin-algorithm-f6-0-idd80 |
Finger capture |
|---|
| plugin-finger |
| Available algorithm plugins |
| plugin-algorithm-f5-4-low75 |
| plugin-algorithm-f5-0-vid81 |
| plugin-algorithm-f6-0-idd80 |
| plugin-algorithm-f6-5-low70 |
| plugin-algorithm-fingerv9 |
Document capture |
|---|
| plugin-improved-pdf417-detection |
Warning: Only one of: plugin-face-lite, plugin-face-normal, plugin-face-cr2dmatching can be used at a time. The integrator must pick one of them. A MultipleFaceInitPluginsException will occur if more than one has been picked.
SDK variants and their plugins
Each SDK plugin variant delivers something different - check carefully what each plugin variant contains. Plugin variants should not be added in a module that uses this specific variant. As can be seen below, no document-related plugins must be added for variants that deliver this feature. In other words, variants contain all plugins that are required and have no alternatives.
Capture SDK |
|---|
| plugin-face |
| plugin-finger |
Plugins that might be added for a Capture SDK variant:
- One of: plugin-face-normal, plugin-face-lite, plugin-face-cr2dmatching
- One of: plugin-algorithm-f5-4-low75, plugin-algorithm-f5-0-vid81, plugin-algorithm-f6-0-idd80, plugin-algorithm-f6-5-low70, plugin-algorithm-fingerv9* (this one is not recommended if face matching will be performed)
Biometric Capture SDK |
|---|
| plugin-face |
| plugin-finger |
Plugins that can be added for the Biometric Capture SDK variant:
- One of: plugin-face-normal, plugin-face-lite, plugin-face-cr2dmatching
- One of: plugin-algorithm-f5-4-low75, plugin-algorithm-f5-0-vid81, plugin-algorithm-f6-0-idd80, plugin-algorithm-f6-5-low70 plugin-algorithm-fingerv9 (this one is not recommended if face matching is going to be performed)
SmartFinger |
|---|
| plugin-finger |
| plugin-algorithm-fingerv9 |
There are no plugins for the SmartFinger variant.
SmartFace |
|---|
| plugin-face |
Plugins that can be added for the SmartFace variant:
- One of: plugin-face-normal, plugin-face-lite, plugin-face-cr2dmatching
- One of: plugin-algorithm-f5-4-low75, plugin-algorithm-f5-0-vid81, plugin-algorithm-f6-0-idd80, plugin-algorithm-f6-5-low70
SmartFaceDoc |
|---|
| plugin-face |
| plugin-face-lite |
Plugins that can be added for the SmartFaceDoc variant:
- One of: plugin-algorithm-f5-4-low75, plugin-algorithm-f5-0-vid81, plugin-algorithm-f6-0-idd80, plugin-algorithm-f6-5-low70
However, this variant is meant to be used with WebBioServer which performs matching operations (no need to do that locally).
For SDK variants with document plugin-improved-pdf417-detection may be added in order to improve capture of barcodes.
Feature plugins descriptions
plugin-face
Basic plugin needed for face capture. Usually it is predefined in every SDK variant that delivers face capture functionality.
plugin-face-normal
Should be used for face capture when WebBioServer is not used and there is a need for strong security during local liveness challenges.
plugin-face-lite
Should be used when WebBioServer is used for liveness check during face capture, because it can reduce the size of application significantly.
plugin-face-cr2dmatching
Should be used for local usage (without WebBioServer) when additional security feature for FaceLiveness.ACTIVE mode is needed.
plugin-finger
Plugin needed for finger capture. Usually it is predefined in every SDK variant that delivers finger capture functionality.
plugin-improved-pdf417-detection
Plugin that can be used to speed up barcode capture.
Algorithm plugins descriptions
plugin-algorithm-f6-0-idd80
It is more accurate than f5-4-low75 and much smaller than f5-0-vid81.
plugin-algorithm-f5-4-low75
Improved to perform better with default compression. If a previous SDK has been used before and there is a user base with stored templates already, then full migration of the user's biometrics will be required. All templates must be generated again with the new plugin in use.
plugin-algorithm-f5-0-vid81
This is the default algorithm that is compatible with previous SDK versions.
plugin-algorithm-f6-5-low70
Recommended algorithm for face capture. It is more accurate than f6-0-idd80. If a previous SDK has been used before and there is a user base with stored templates already, then full migration of the user's biometrics will be required. All templates must be generated again with the new plugin in use.
plugin-algorithm-fingerv9
Provides only finger matching feature. It is best to pick this one when only finger matching will be performed.
WARNING
The algorithms are NOT compatible with each other. The templates generated by one of the algorithms cannot be processed with the other one; that is, it is not possible to match a template generated with F6_0_IDD80 against a template generated with F5_4_LOW75 or F5_0_VID81. If an integrator wants to change the algorithm in their solution, all the stored templates must be recreated with the new algorithm.
SDK size
This is the estimated size of an SDK variant with all its dependencies, like predefined plugins (see Plugins section). The UI-extension is not included in size as it is not a predefined dependency.
SDK variant | Size |
|---|---|
| CaptureFace | 24.29 MB |
| CaptureDocument | 16.94 MB |
| CaptureFinger | 17.24 MB |
| CaptureBiometry | 28.78 MB |
| CaptureBiometry_document | 43.48 MB |
| CaptureFace_document | 38.99 MB |
Plugins size
Plugin | Size |
|---|---|
| plugin-face | 7.59 KB |
| plugin-face-normal | 6.75 MB |
| plugin-face-lite | 4.79 MB |
| plugin-face-cr2dmatching | 6.75 MB |
| plugin-finger | 794.64 KB |
| plugin-algorithm-f5-4-low75 | 12.30 MB |
| plugin-algorithm-f5-0-vid81 | 4.08 MB |
| plugin-algorithm-f6-5-low70 | 7.45 MB |
| plugin-algorithm-fingerv9 | 1.51 KB |
| plugin-improved-pdf417-detection | 8.81MB |
Integration guide
The purpose of this document is to show the API of the SDK and expose all of its involved objects.
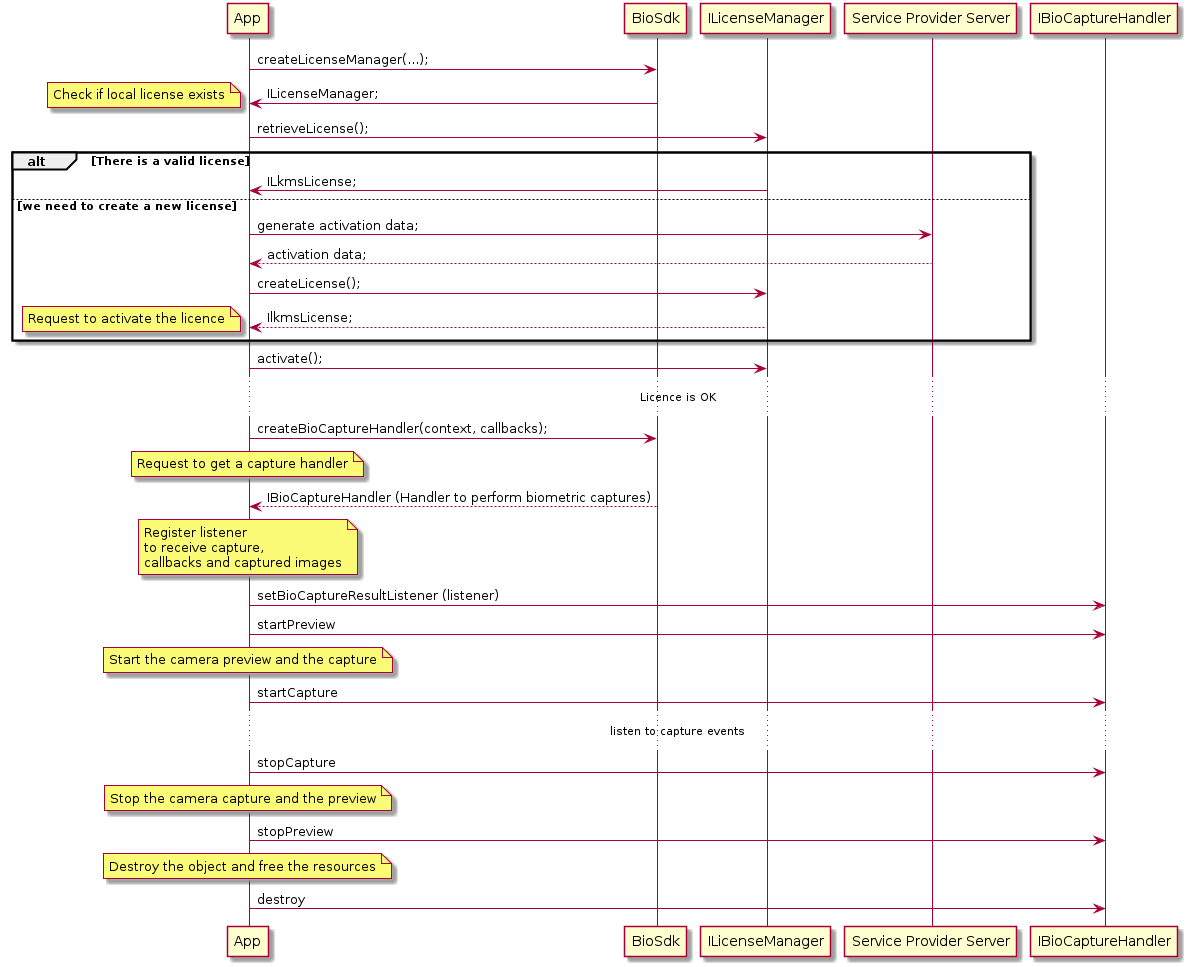
Use cases
Capture biometrics
Below is the generic execution flow to perform a biometric capture (Get Picture), and get information about the biometry. For example, getting a picture and moving your head to the left.
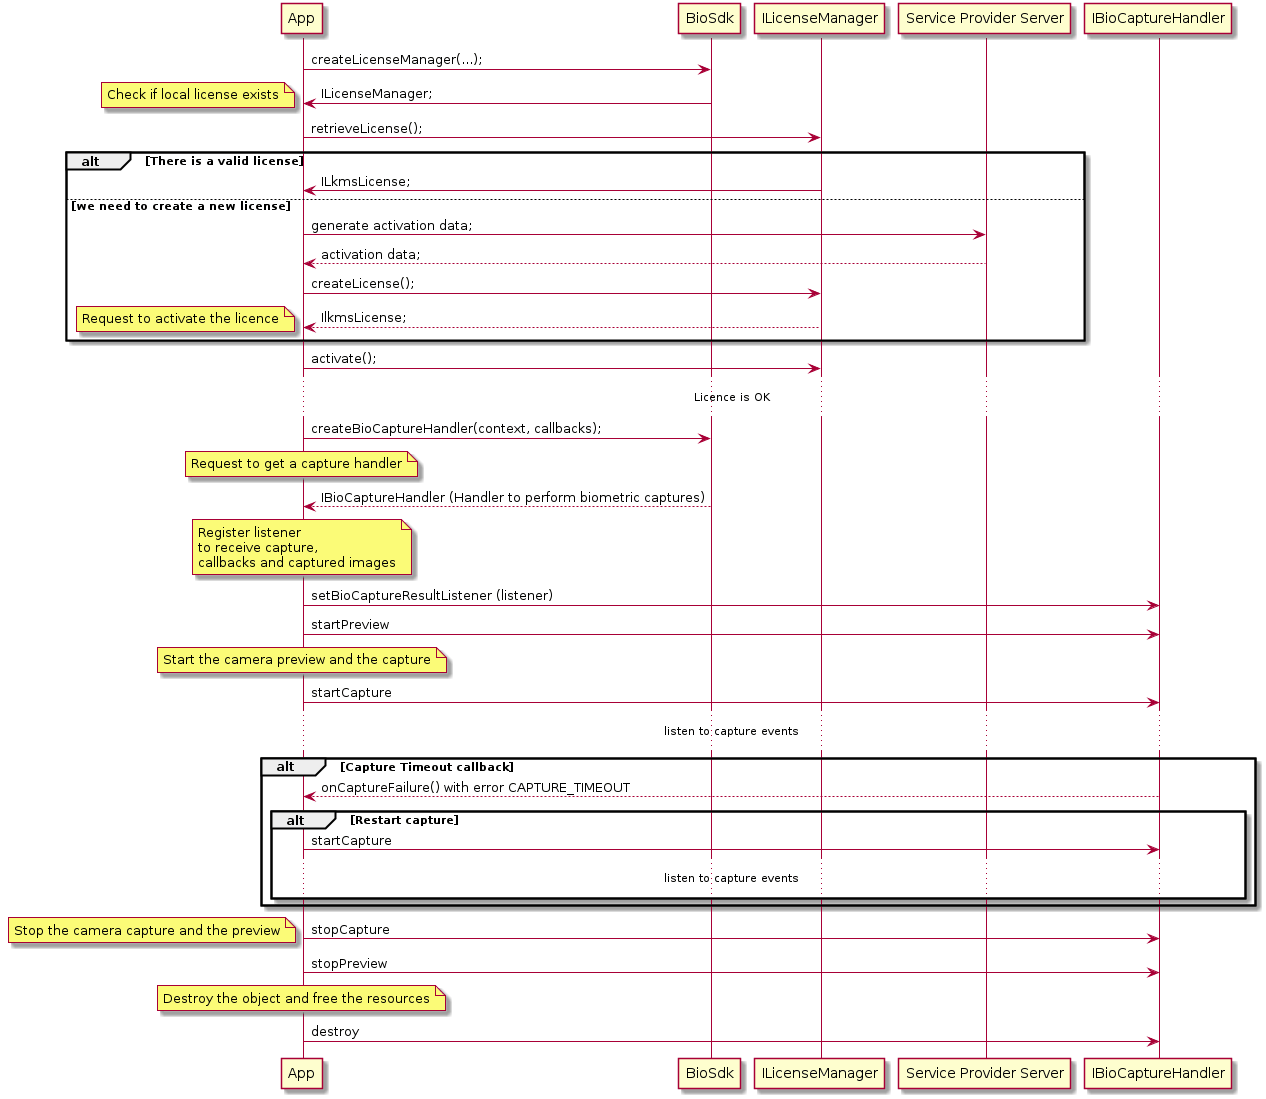
Capture timeout
Below is the generic execution flow to be followed when a capture timeout occurs.
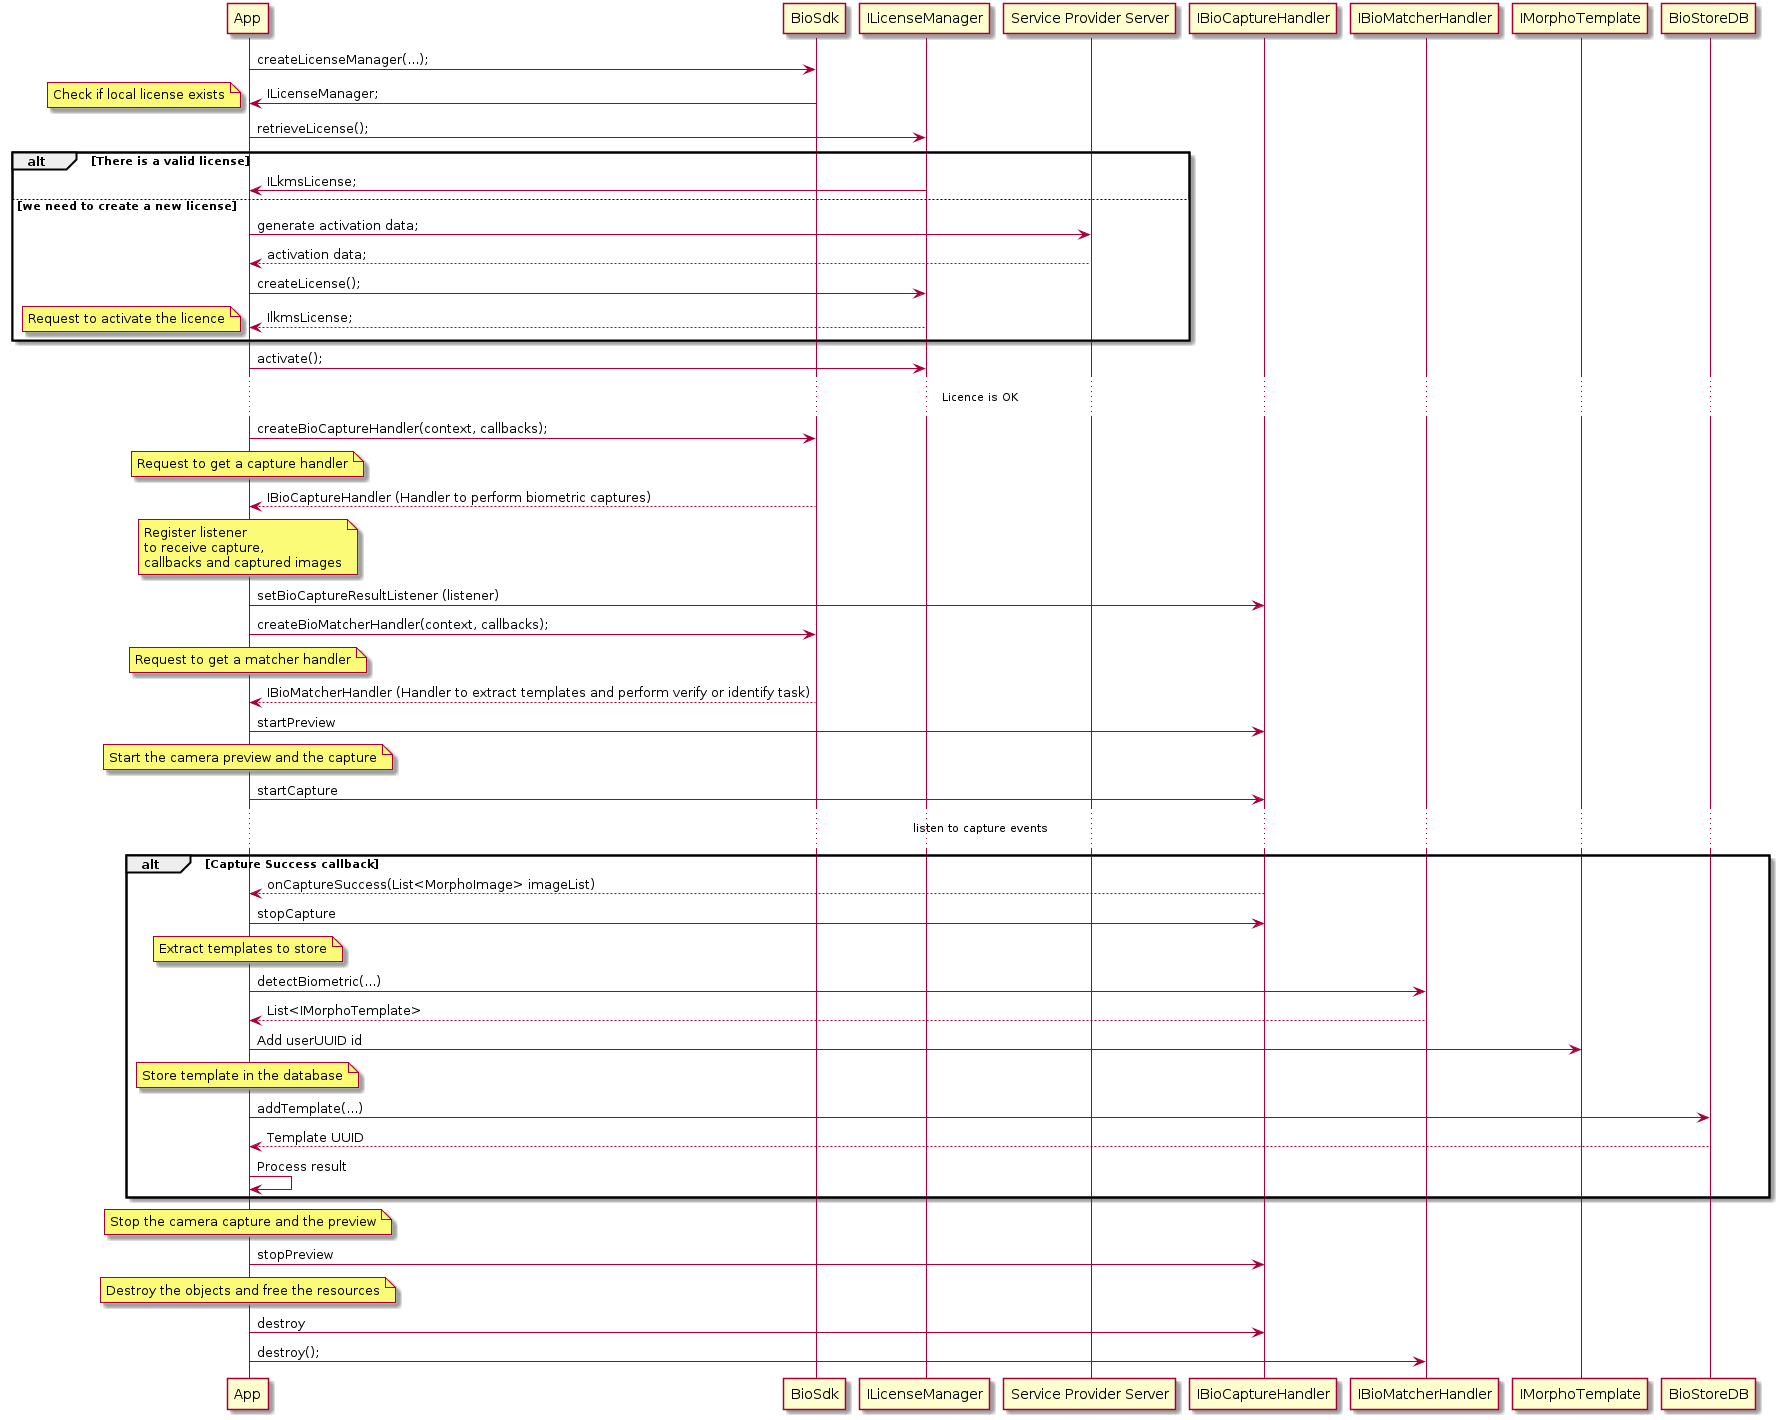
Capture enroll
Below is the generic execution flow to perform a biometric capture (Get Picture). After that, the biometrics template is extracted from
the image returned by the capture component. The biometric template is linked to one user using the userUUID. The UUID of this template
and the userUUID are stored in a database.
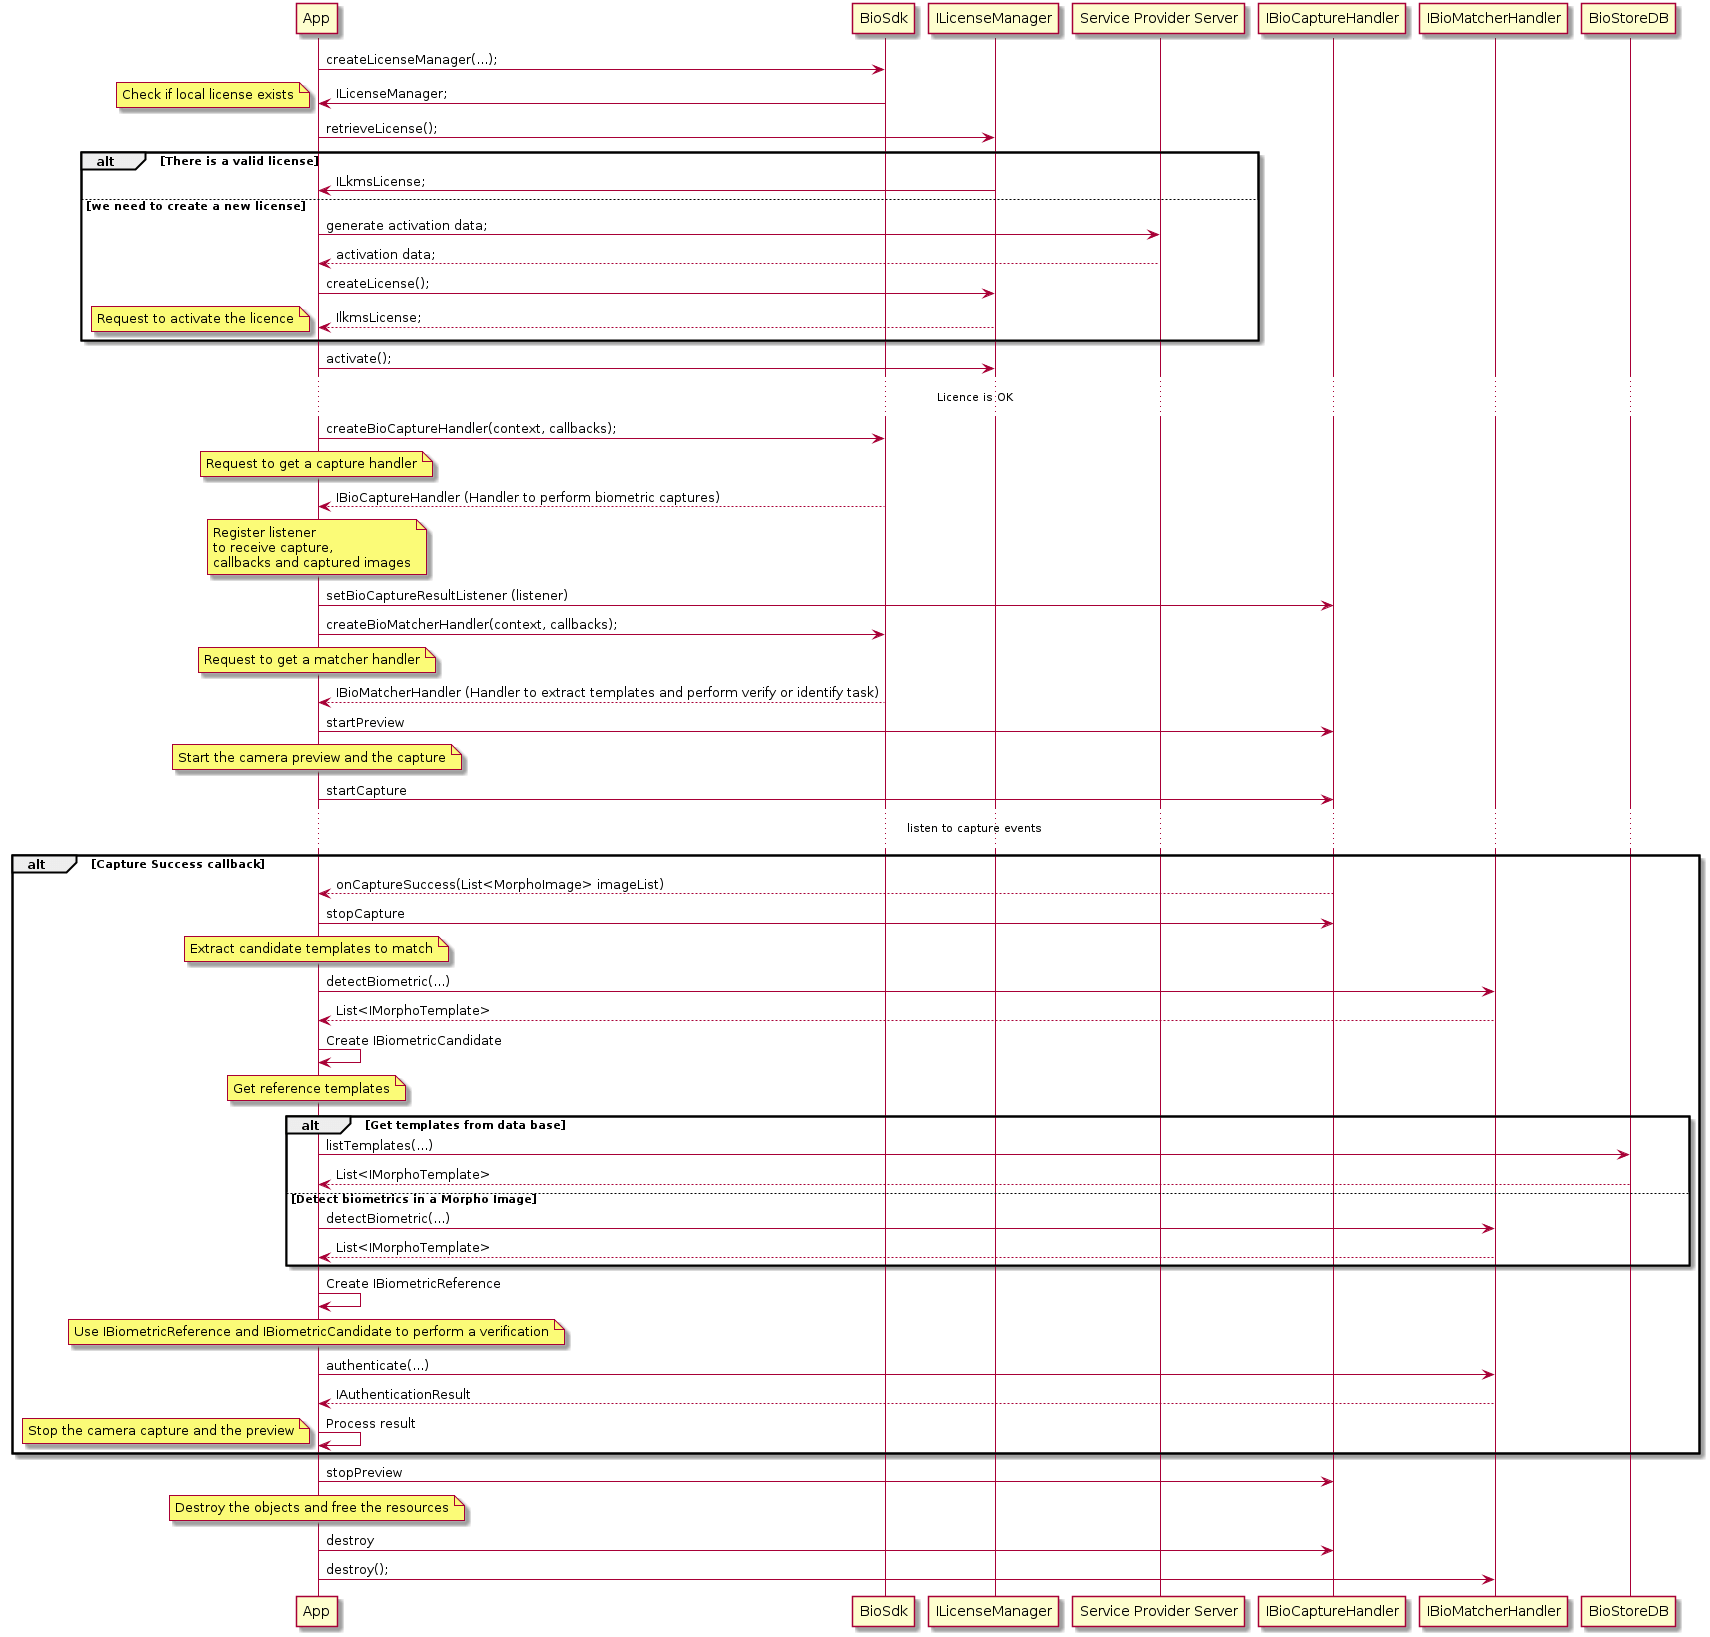
Capture authenticate
Below is the generic execution flow to perform a biometric capture (Get Picture). The biometrics template is then extracted from the image
and returned by the capture component. These are the candidate templates that you must use to create an IBiometricCandidate.
After the IBiometricCandidate is created, a list of reference templates must be extracted. These will then be used to create
an IBiometricReference object with which to match against the IBiometricCandidate and authenticate that the candidate templates belong
to the user.
There are two ways to extract a list of template references: the first is to retrieve them from the database used during the enrollment
process; the second is to extract the templates from another image with detectBiometrics(...).
Capture identify
Below is the generic execution flow to perform a biometric capture (Get Picture). The biometrics template is then extracted from the image
and returned by the capture component. These are the candidate templates which you must use to create an IBiometricCandidate.
After the IBiometricCandidate is created, a list of reference templates must be extracted. These will then be used to create
an IBiometricReference object with which to match against the IBiometricCandidate and authenticate that the candidate templates belong
to the user.

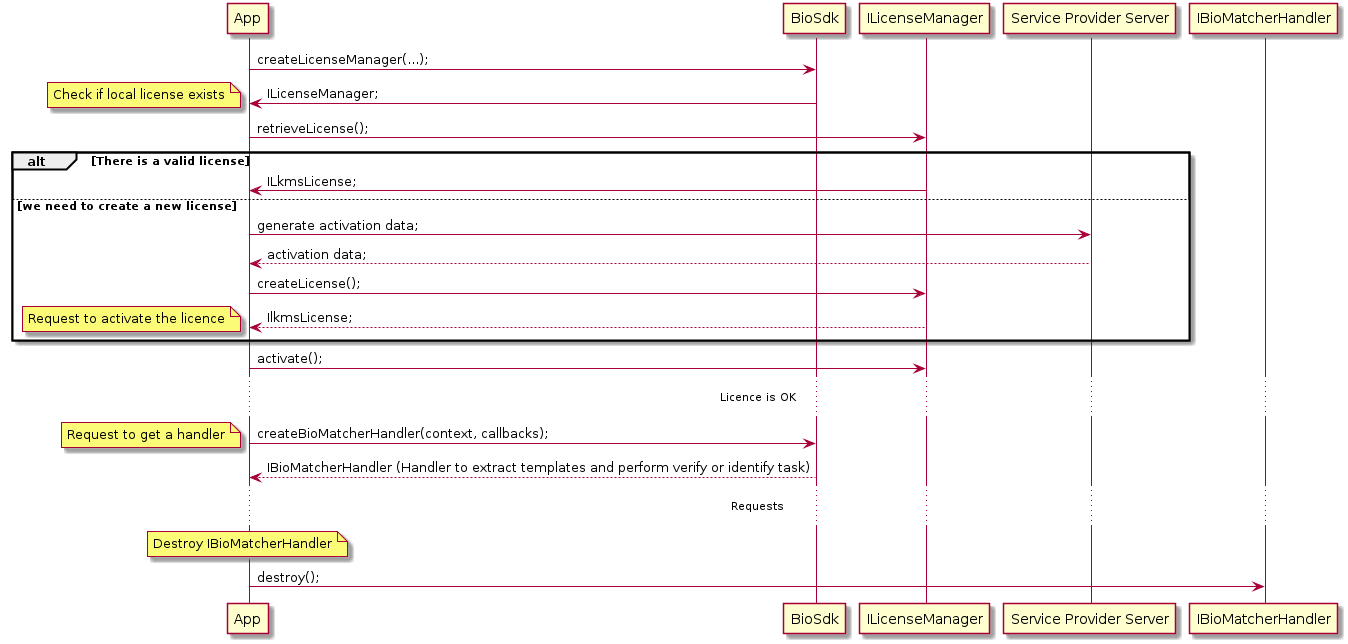
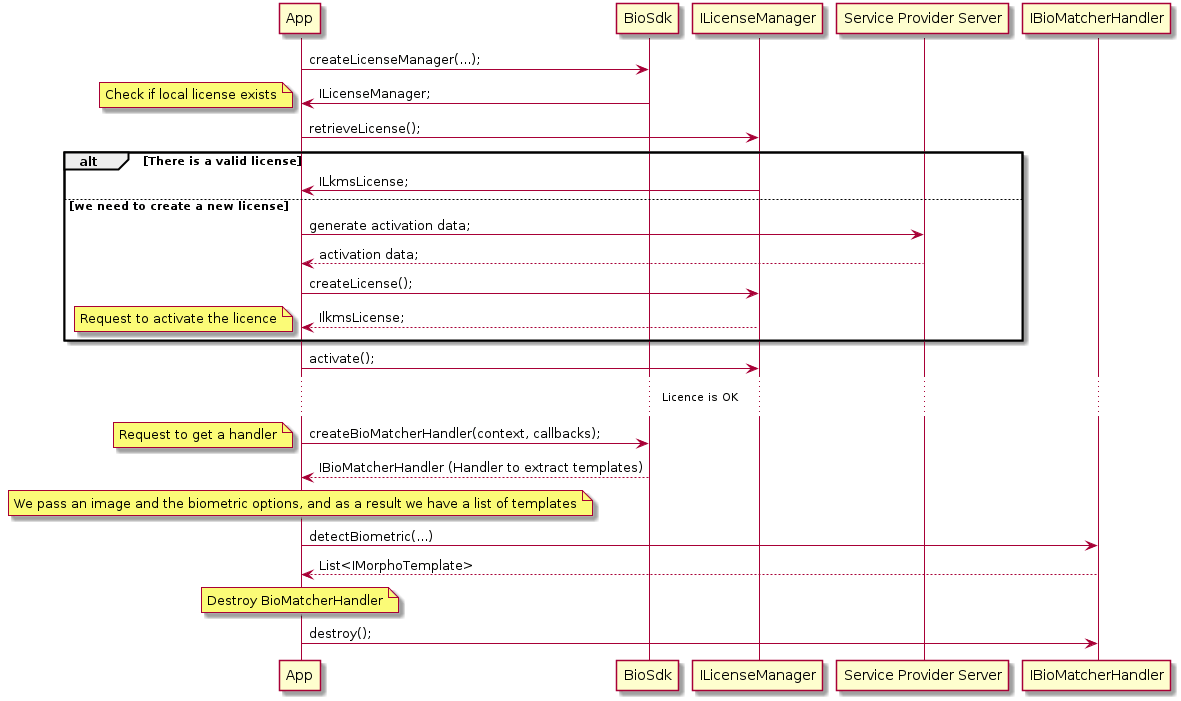
Creating BioMatcherHandler
Below is the generic execution flow to retrieve and release a BioMatcherhandler.
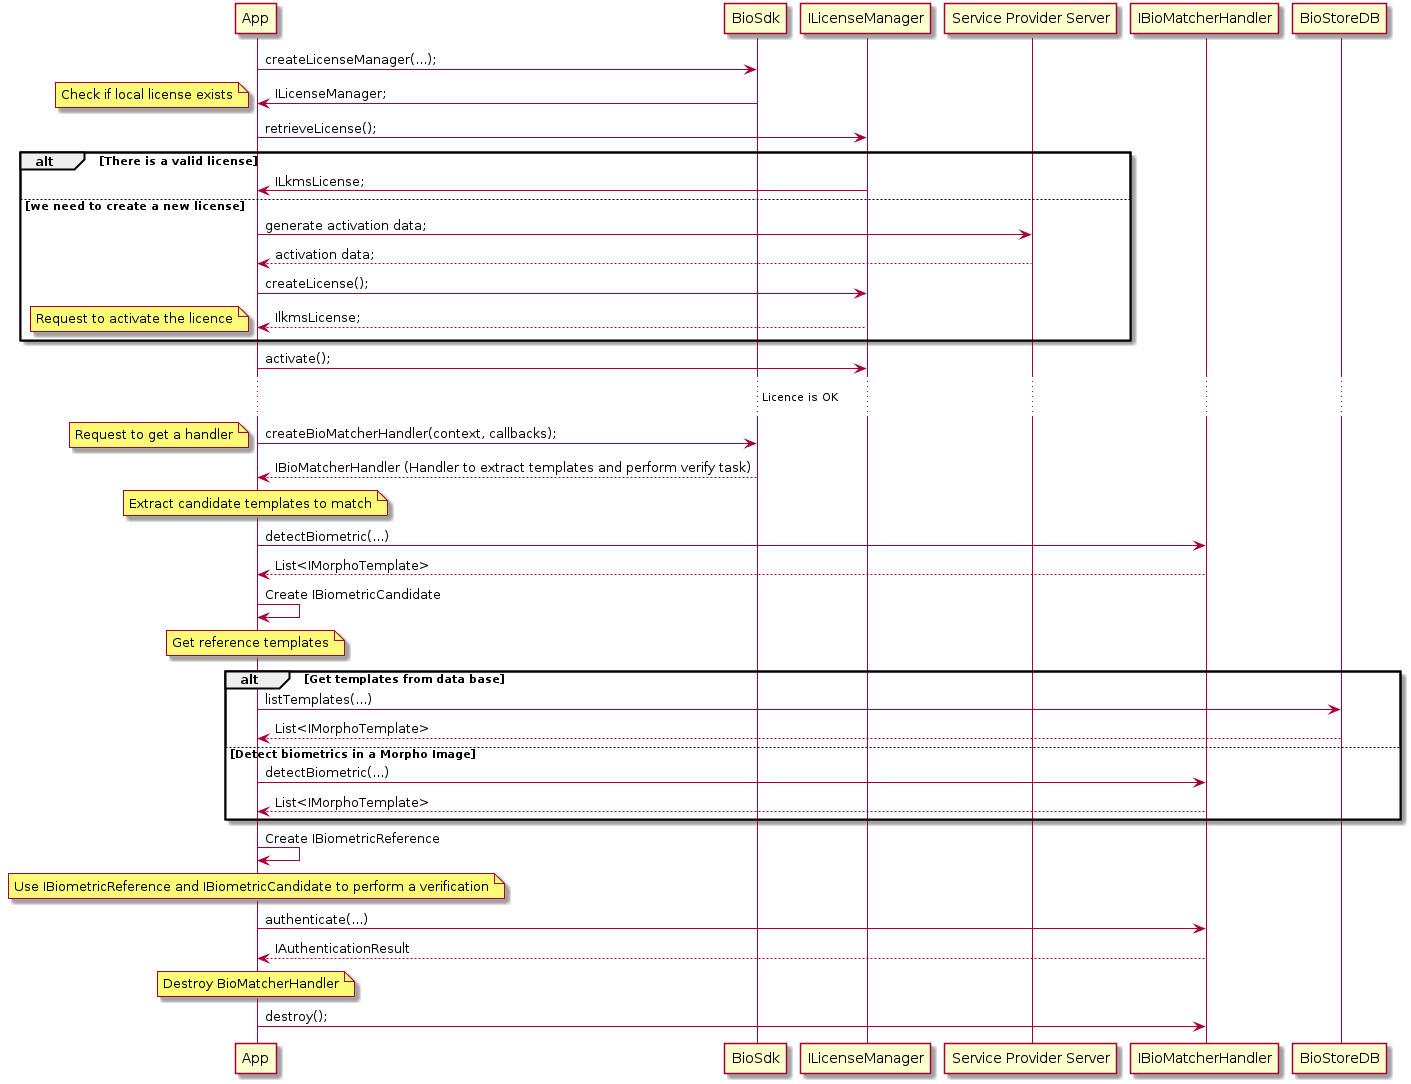
Authenticating
Below is the generic execution flow to perform a generic verification process which involves extracting the biometrics template from an
image. These are the candidate templates which you must use to create an IBiometricCandidate.
After the IBiometricCandidate is created, a list of reference templates must be extracted. These will then be used to create
an IBiometricReference object with which to match against the IBiometricCandidate and authenticate that the candidate templates belong
to the user.
There are two ways to extract a list of template references: the first is to retrieve them from the database used during the enrollment
process; the second to is extract the templates from another image with detectBiometrics(...).
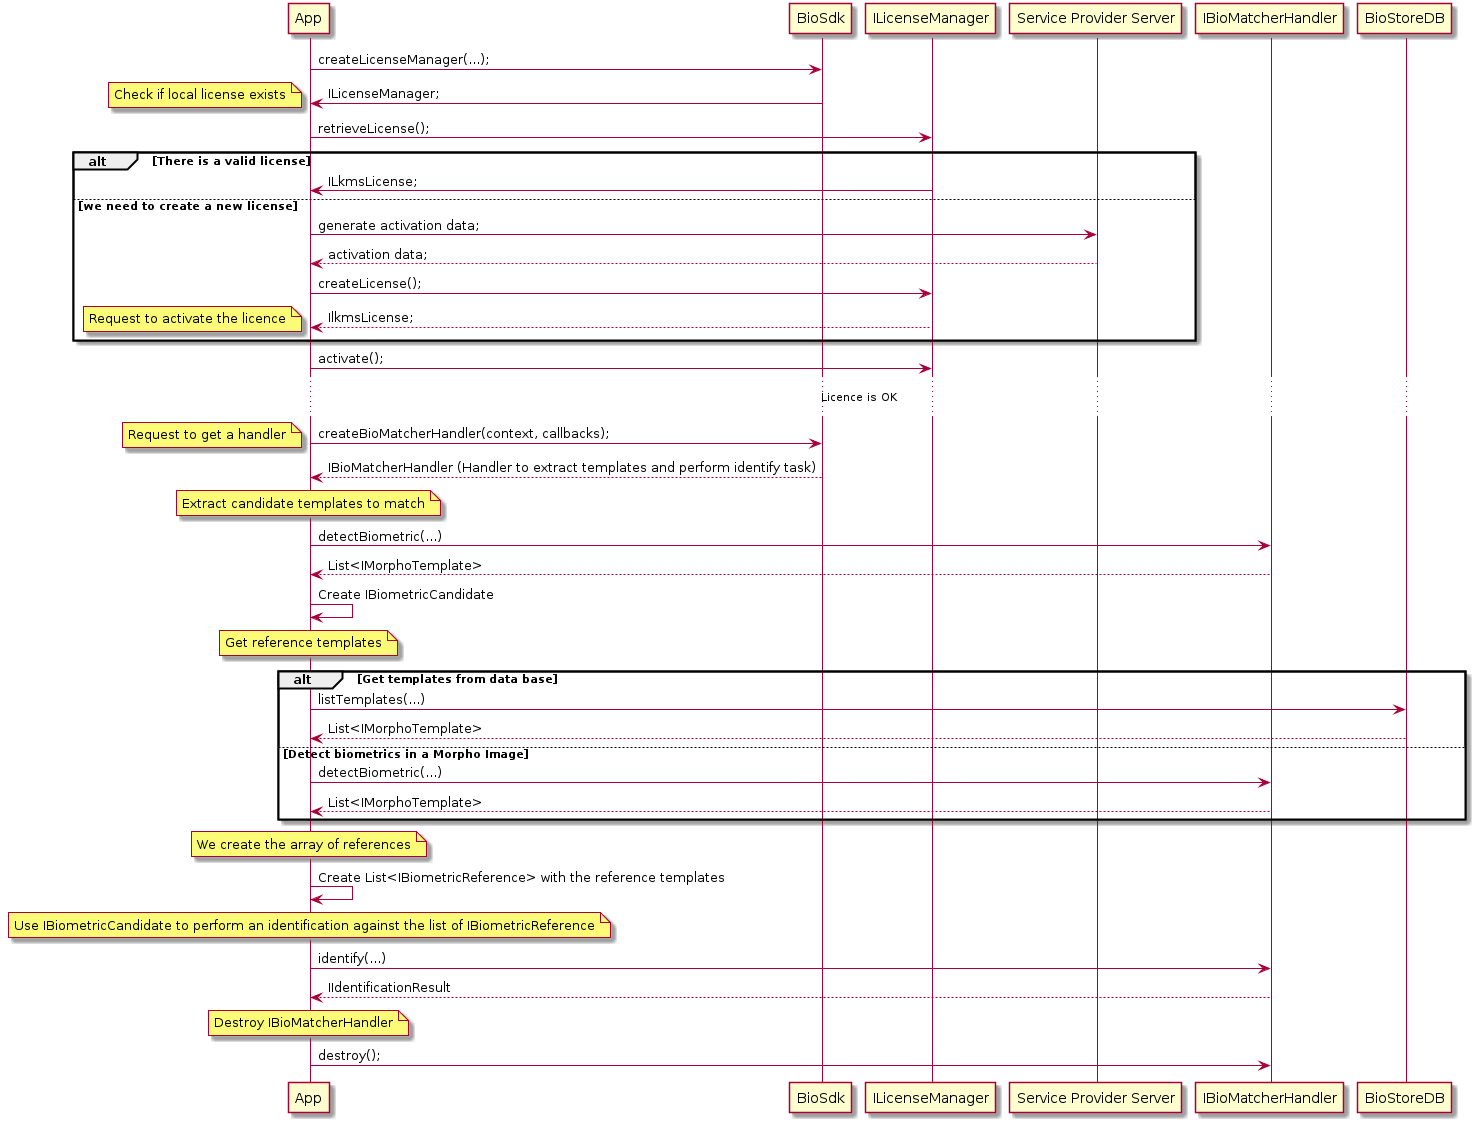
Identifying
Below is the generic execution flow to perform a generic identification process which involves extracting the biometrics template from an
image. These are the candidate templates which you must use to create an IBiometricCandidate.
After the IBiometricCandidate is created, a list of reference templates must be extracted. These will then be used to create
an IBiometricReference object with which to match against the IBiometricCandidate and authenticate that the candidate templates belong
to the user.
Detect biometrics
This describes detecting the biometrics in an IImage. This function is intended to be used to extract all the biometric templates
contained in an image; for example, all the faces that are in an image.
Face capture - new API (recommended)
Introduction
In order to make integration of the SDK easier and more intuitive - new API for Face Capture has been delivered. It is based on use cases that are self-explaining which provide specific information depending on a given use case. This allows integrator to focus on working with the data provided by the SDK rather than on SDK configuration.
Old API is still available for backward compability for already integrated users. It's description might be found here.
NOTE: The new API now supports both: remote and local liveness use cases.
Integration
License activation
First step that is mandatory to use SDK is to activate license and grant camera permission for application. This part is common for old API and the new one. License handling can be found here.
Adding FaceCaptureView
FaceCaptureView is a key component of SDK. It not only provides preview for the capture but also it is an entry point to SDK's API. It means that on this component integrator sets up capture and orchestrate it's flow.
FaceCaptureView should be added to the layout of capture Activity. It is done as any other android's view. It must be visible to the end user.
XML1<androidx.constraintlayout.widget.ConstraintLayout2 xmlns:android="http://schemas.android.com/apk/res/android"3 xmlns:app="http://schemas.android.com/apk/res-auto"4 android:layout_width="match_parent"5 android:layout_height="match_parent"6 android:orientation="horizontal">78 <com.idemia.capture.face.api.FaceCaptureView9 android:id="@+id/captureView"10 android:layout_width="0dp"11 android:layout_height="0dp"12 app:layout_constraintBottom_toBottomOf="parent"13 app:layout_constraintEnd_toEndOf="parent"14 app:layout_constraintStart_toStartOf="parent"15 app:layout_constraintTop_toTopOf="parent" />1617</androidx.constraintlayout.widget.ConstraintLayout>
As FaceCaptureView is also entry point to SDK, it should be also invoked with proper methods in application logic. This can be done by old way - findViewById:
Kotlin1private var captureView: FingerCaptureView? = null23override fun onCreate(savedInstanceState: Bundle?) {4 super.onCreate(savedInstanceState)5 setContentView(R.layout.your_activity_layout)67 captureView = findViewById(R.id.captureView)8}
or with more popular way - through binding:
Kotlin1lateinit var binding: YourActivityCaptureBinding23override fun onCreate(savedInstanceState: Bundle?) {4 super.onCreate(savedInstanceState)5 binding = YourActivityCaptureBinding.inflate(layoutInflater)6 setContentView(binding.root)78 val captureView = binding.captureView9}
Creating use case
In order to perform capture, the next step is to create use case we are interested in. As mentioned above - new API focuses on what we want to do and not on how we want to do. In order to achieve that, use cases have been introduced. They define what will be done and require (at least for result) set of listeners to provide information about capture.
Kotlin1val remoteUseCase =2 RemoteUseCase(3 sessionId,4 RemoteCaptureListeners(5 faceTrackingInfo = faceTrackingInfoListener,6 captureFeedback = feedbackListener,7 captureLivenessListener = captureLivenessListener,8 stepInfoListener = stepInfoListener,9 passiveVideoListener = passiveVideoListener,10 captureResultListener = captureResultListener11 ),12 environmentInfo13 )
More about use cases and their properties can be found in dedicated section.
Setting up capture
When license is activated, camera permission is granted, and use case has been created, it is time to set up capture and perform it. In order to do that use method setUp on FaceCaptureView:
Kotlin1fun setUp(useCase: UseCase, lifecycle: Lifecycle?, uiSettings: UISettings?)
Please find below explanation to each function argument:
Parameter | Description |
|---|---|
| useCase UseCase | This is use case instance providing type of capture and allowing integrator to get data from it |
| lifecycle Lifecycle | This is Android's component allowing SDK be lifecycle aware. Argument is optional. If not provided integrator has to explicitly manage flow. If lifecycle is provided there is no need to start/cancel/destroy flow. |
| uiSettings UISettings | Settings providing details to UI-Extensions library. If not provided integrator has to handle displaying proper UI to end user on his own. More information about it can be found here. |
In case that Lifecycle component is not configured, methods:
- start() - Start's capture and liveness verification flow. Recommended to invoke in onResume or onStart methods of Android's lifecycle.
- cancel() - Cancels flow. Recommended to invoke in onPause or onStop methods of Android's lifecycle - depending on desired effect.
- destroy() - Cleans up capture view and it's data. Recommended to invoke in onDestroy method of Android's lifecycle. have to be called explicitly by integrator in order to provide smooth and stable user experience.
Provided that above steps has been done, capture needs to be set up, as in the following example:
Kotlin1[code in Activity]23fun setupView(useCase: UseCase) {4 binding.captureView.setUp(5 useCase,6 lifecycle,7 UISettings(passiveVideoSettings, passiveSettings, joinThePointsCaptureSettings)8 )9}
Here is example of UISettings setup. Keep in mind that this class keep configuration for each FaceLiveness mode except from NO_LIVENESS:
Kotlin1val joinThePointsCaptureSettings = joinThePointsChallengeSettings {2 useInterpolation = true3 scene {4 overlay {5 showOverlay = true6 imageRes = R.drawable.ic_face_overlay7 marginVertical = R.dimen.default_face_overlay_vertical_padding8 marginHorizontal = R.dimen.default_face_overlay_vertical_padding9 text {10 text = R.string.default_overlay_text11 textSize = R.dimen.default_overlay_text_size12 textColor = Color.parseColor(Colors.text_black)13 }14 }15 capturedLineOpacity = 0.5f16 pointer {17 type = PointerType.PULSING18 collisionWithTargetAction = PointerCollisionAction.NONE19 }20 target {21 pulseAnimation {22 waves = 323 }24 showMarkOnCurrentTarget = true25 }26 verticalTilt {27 enabled = false28 }29 tapping {30 enabled = false31 }32 result {33 failureImageResId = R.drawable.ic_challenge_failed34 successImageResId = R.drawable.ic_challenge_success35 }36 }37}3839val passiveSettings = passiveCaptureSettings {40 scene {41 background {42 colorEnd = Color.parseColor("#189482")43 colorStart = Color.parseColor("#38ddb8")44 }45 previewScale {46 scaleX = 1.0f47 scaleY = 1.0f48 }49 feedback {50 colorText = Color.parseColor(Colors.white)51 }52 overlay {53 showOverlay = true54 }55 tapping {56 colorBackground = Color.parseColor("#FAFAFA")57 colorImage = Color.parseColor(Colors.black)58 colorText = Color.parseColor(Colors.black)59 textResId = "Use your head to interact"60 textH1ResId = "No tapping needed"61 enabled = true62 }63 verticalTilt {64 colorBackground = Color.parseColor("#FAFAFA")65 colorImage = Color.parseColor("#000000")66 colorText = Color.parseColor("#000000")67 textResId = "Please hold your phone vertically."68 enabled = true69 }70 countdown {71 countdownSeconds = 372 }73 delay {74 isEnabled = true75 message = "Authentication locked.\nPlease wait for:\n%1$s"76 }77 }78}7980val passiveVideoSettings = passiveVideoCaptureSettings {81 scene {82 preparationScene {83 backgroundColor = Color.WHITE84 }85 faceOverlay {86 progressBar {87 progressFill = Color.GREEN88 }89 }90 background {91 colorEnd = Color.parseColor("#189482")92 colorStart = Color.parseColor("#38ddb8")93 }94 previewScale {95 scaleX = 1.0f96 scaleY = 1.0f97 }98 feedback {99 videoBackground { }100 }101 tapping {102 colorBackground = Color.parseColor("#FAFAFA")103 colorImage = Color.parseColor("#000000")104 colorText = Color.parseColor("#000000")105 textResId = "Use your head to interact"106 textH1ResId = "No tapping needed"107 enabled = true108 }109 verticalTilt {110 colorBackground = Color.parseColor("#FAFAFA")111 colorImage = Color.parseColor("#000000")112 colorText = Color.parseColor("#000000")113 textResId = "Please hold your phone vertically."114 enabled = true115 }116 delay {117 isEnabled = true118 message = "Authentication locked.\nPlease wait for:\n%1$s"119 }120 }121}
Use cases
As mentioned in sections above new API is meant to be easier to integrate and more intuitive in general. In order to achieve that use cases have been introduced. Every use case is dedicated to do particular job. Please find below list of available use cases.
RemoteUseCase (recommended)
This use case is used to perform face capture with backend liveness verification. Thanks to this use case integrator does not have to integrate with backend services as it provides end to end integration. However, few things needs to be provided:
- Session id for given capture
- RemoteCaptureListeners
- EnvironmentInfo
Kotlin1RemoteUseCase(sessionId: String, listeners: RemoteCaptureListeners, environmentInfo: EnvironmentInfo)
Parameter | Description |
|---|---|
| sessionId String | Session id correlated with face capture. Most popular approach is to create session outside of application (integrator's backend) and pass it to it. Can be created via backend components: GIPS or directly via WebBio. Please find more instructions according to session creation below. |
| listeners RemoteCaptureListeners | Group of listeners related to remote use case. They help to gather capture data and informs about flow state and result. See listeners section for more details. |
| environmentInfo EnvironmentInfo | Informations about Proofing Platform environment and authentication method. |
RemoteCaptureListeners - detailed description of each listeners can be found in listeners section.
Parameter | Description |
|---|---|
| livenessActiveListener LivenessActiveListener | Provides information about liveness ACTIVE mode. Usefull when UISettings are not provided to FaceCaptureView. |
| faceTrackingInfo FaceTrackingInfoListener | Provides coordinates with face. |
| captureFeedback CaptureFeedbackListener | Provides feedback that should be presented to end user to improve capture process. Handled when UISettings are used. |
| captureLivenessListener CaptureLivenessListener | Provides information about liveness mode for current capture. |
| stepInfoListener StepInfoListener | Provides information about state of capture. |
| passiveVideoListener PassiveVideoListener | Provides information about liveness PASSIVE_VIDEO mode. Usefull when UISettings are not provided to FaceCaptureView. |
| captureResultListener RemoteCaptureResultListener | Provides information about result of whole flow. |
| livenessProcessingListener LivenessProcessingListener | Provides progress of sending user image metadata to the server. It takes values from 0.0 to 1.0 |
EnvironmentInfo
FaceCapture is compatible with two types of the authorization: API Key and OAuth.
- In token type authorization, an access token is generated by the authorization server using the provided secrets. This token can be
utilized by creating an
AccessTokenclass and using the appropriate initializer in theEnvironmentInfoclass:init(accessToken: AccessToken, baseUrl: URL). - The
AccessTokenclass holds information about the secret and token type from the OAuth authorization server.
Secrets can be found on the webpage: https://experience.idemia.com/dashboard/my-identity-proofing/access/environments/.
Access Token solution constructor:
Parameter | Description |
|---|---|
| baseUrl String | URL to Proofing services. For example production URL is: |
| https://proofing.app.eu.identity-prod.idemia.io:443/ | |
| accessToken AccessToken | Dedicated information about access token used to authenticate on Proofing services. Do not share this |
| and try to avoid storing it on application's repository |
ApiKey solution constructor:
Parameter | Description |
|---|---|
| baseUrl String | URL to Proofing services. For example production URL is: https://proofing.app.eu.identity-prod.idemia.io:443/ |
| apiKey String | Dedicated key used to authenticate on Proofing services. Do not share this and try to avoid storing it on application's repository |
AccessToken
Parameter | Description |
|---|---|
| secret String | Dedicated token used to authenticate on Proofing services. Do not share this and try to avoid storing it on |
| application's repository | |
| tokenType String | Token type to indicate how it should be used in authorization request. |
Creating capture session
RemoteUseCase handles liveness verification on backend side. It requires to create session per capture. Common approach is to create session on integrator's backend side and provide it to application. Then capture flow might be triggered. Good to start with pages:
- General description of liveness remote capture - here
- GIPS API description - here
- WebBio API description - here
For example, creating session via GIPS requires:
-
Create identity by calling:
POST: /v1/identitiesAs a result an identity is being returned -
Submit confirmation that the user has consented to perform specific evidence verifications:
POST: /v1/identities/{id}/consents -
Start liveness session by calling:
POST: /v1/identities/{id}/attributes/portrait/live-capture-session?mode=nativeSDKResponse to this call contains session id used by SDK.
Proceeding with WebBio requires:
-
Create session by calling:
POST: /bioserver-app/v2/bio-sessionsCall must contain session data in body. -
Retrieve session path from the response:
Kotlin1val bioSessionPath = response.headers()["Location"]
-
Get BioSession:
GET: /bioserver-app{bioSessionPath}Response to this call contains session id used by SDK. -
Initialize the session with id from previous step and liveness parameters passed in body:
POST: /bioserver-app/v2/bio-sessions/{bioSessionId}/init-liveness-parameters
Snippet below shows use case creation:
Kotlin1val environmentInfo = EnvironmentInfo(2 "https://proofing.app.eu.identity-prod.idemia.io:443/",3 "YourApiKey"4)5val sessionInfo = sessionHandler.createSession(6 readFaceLivenessModeFromSettings(),7 readFaceSecurityLevelFromSettings()8)9val remoteUseCase = RemoteUseCase(10 sessionInfo.sessionId,11 RemoteCaptureListeners(12 faceTrackingInfo = faceTrackingInfoLoggingListener,13 captureFeedback = feedbackListener,14 captureLivenessListener = captureLivenessLoggingListener,15 stepInfoListener = stepInfoListener,16 passiveVideoListener = passiveVideoLoggingListener,17 captureResultListener = captureResultListener18 ),19 environmentInfo20)
If this guide is not enough, there is still FaceSampleAppLite source code on our Artifactory repository. Feel free to download latest package with GIPS implementation from here or WBS implementation from here and see integration with session creation included.
Keep in mind that result of flow on SDK side is sending required data to backend service. Captured image might be required for application needs. To aquire it, additional request to WebBioServer has to be done. API description related to this can be found here.
Simple interface responsible for starting illumination process. It's returned by onIlluminationDemand method of MlcListener.
Listeners
New API introduces multiple listeners to acquire capture related data by integrator. All listeners are being called on UI thread and it is safe to manipulate UI components directly from them.
CaptureLivenessListener
Returns information about current liveness capture mode. Usefull for RemoteUseCase where mode comes from backend side.
Kotlin1fun captureLiveness(liveness: Liveness)
Liveness
Value | Description |
|---|---|
| ACTIVE | Means that current liveness mode is active one. User need to connect points using face. |
| PASSIVE | Means that current liveness mode is passive one. No challenges for user. |
| PASSIVE_VIDEO | More advanced variant of passive mode. It requires backend integration (can be used with RemoteUseCase) as it uses more restrictive liveness algorithms. |
StepInfoListener
This listener provides information about capture flow state within StepInfo object.
Kotlin1fun stepInfo(stepInfo: StepInfo)
StepInfo
Value | Description |
|---|---|
| PREPARING_LIVENESS | Liveness challenge is being prepared. |
| CAPTURE_STARTED | Capture has been started. Preview should actively show frames from camera. |
LivenessActiveListener
This listener provides information about active face capture. This mode requires user to connect dots in correct order by moving his face. Callbacks tells integrator what is current status of challenge and what to display. Keep in mind that by providing UISettings to FaceCaptureView, there is no need to handle that because SDK will draw this challenge with style provided.
Kotlin1fun onPointerUpdate(pointInfo: PointerInfo)
PointerInfo contains information about user's "viewfinder" position. This is the point that user needs to put on a target in order to mark it as "captured".
Kotlin1fun onTargetUpdate(targetInfo: TargetInfo)
TargetInfo contains information about targets to capture.
Parameter | Description |
|---|---|
| x Int | X coordinate of target. |
| y Int | Y coordinate of target. |
| show Boolean | Indicates if target should be visible to user. |
| radius Int | Radius of target relative to capture frame size. |
| number Int | Number of target. |
| completness Float | Value ranged from 0.0 to 1.0, where 1.0 tells that target is fully captured. |
| current Boolean | Informs if given target is currently active one (to be captured). |
Kotlin1fun onNumberTargets(numberOfTargets: Int)
This callback provides information about how many points needs to be captured to pass challenge.
PassiveVideoListener
This listeners helps to pass passive video liveness capture mode. Before capture starts there is a preparation phase and capture itself has it's progress. Information are provided within this listener should be presented to end user. Keep in mind that by providing UISettings to * FaceCaptureView*, there is no need to handle this listener because SDK will draw this challenge with style provided.
Kotlin1fun onPreparationStarted()
Tells integrator that preparation of capture has been started.
Kotlin1fun onPreparationFinished()
Tells integrator that preparation phase has finished. Now capture will be performed.
Kotlin1fun overlayUpdated(overlay: OvalOverlay)
To make capture easier there is a special configuration for UI oval to be displayed to end user. OvalOverlay has coordinates and size of that oval.
Kotlin1fun progressUpdated(progress: Float)
Progress of capture.
CaptureResultListener
Used for all use cases. Provides information about flow result.
Kotlin1fun onFinish(result: CaptureResult)
CaptureResult instance might be type of Success that is information about successful flow or Failure that contains Error instance inside. For more details see errors section.
CaptureFeedbackListener
This is listener with crucial information for user about the capture. Helps to find optimal position in front of camera.
Kotlin1fun onFeedback(captureFeedback: CaptureFeedback)
Where CaptureFeedback is enum with self-explanatory instruction. It is covered by UISettings* by mapping these to text instructions to the user.
FaceTrackingInfoListener
This listener provides rectangle coordinates and size with face position (relative to preview frame size) in real time during capture. Helpful when there is a need to draw overlay on preview showing detected face.
Kotlin1fun faceTrackingInfo(trackingInfo: FaceTrackingInfo)
FaceTrackingInfo provides "face rectangle" informations.
LivenessProcessingListener
This listener provides information about current progress of uploading metadata to the server.
Kotlin1fun onLivenessMetadataUploadProgressUpdated(@FloatRange(from = 0.0, to = 1.0) progress: Float)
MlcListener
This listener provides information related to MultidimensionalLivenessCheck capture.
It contains following methods:
Kotlin1fun onSmileStabilityChange(@FloatRange(from = 0.0, to = 1.0) value: Float)
Returns the percentage of smile step completion.
Kotlin1fun onSmileSizeChange(@FloatRange(from = 0.0, to = 1.0) value: Float)
Returns current smile size.
Kotlin1fun onSmileFinished()
Called when smile acquisition process has ended.
Kotlin1fun onIlluminationPrepared(@FloatRange(from = 0.0, to = 1.0) scale: Float)
Indicates that illumination process is ready to start. scale parameter is a value between 0.0 and 1.0, and should be used to rescale
preview component before triggering illumination.
Kotlin1fun onIlluminationProgressChange(@FloatRange(from = 0.0, to = 1.0) progress: Float)
Returns current illumination progress value in the range between 0.0 and 1.0.
Kotlin1fun onColorToDisplay(red: Int, green: Int, blue: Int)
Returns colors which should be used as a part of illumination process. Background of preview should change according to those colors.
Kotlin1fun onIlluminationFinished()
Called after end of illumination process.
Kotlin1fun onIlluminationDemand(request: IlluminationRequest)
Returns IlluminationRequest which is used to start illumination.
Additional classes
IlluminationRequest
Kotlin1interface IlluminationRequest {2 fun start()3}
ActiveLivenessUseCase
This use case performs face capture with on-device liveness verification. It means that no external requests are made in order to verify user. "Active" in use case name indicate that in order to pass verification end user has to complete an action. Points on the screen need to be joined in given order using face as a pointer.
Use case should be created using its constructor:
Kotlin1ActiveLivenessUseCase (2 val listeners: ActiveCaptureListeners = ActiveCaptureListeners(),3 val numberOfPoints: Int,4 val timeoutInSeconds: Long = DEFAULT_TIMEOUT_SECONDS,5 val securityLevel: SecurityLevel = SecurityLevel.HIGH,6)
Parameter | Description |
|---|---|
| listeners ActiveCaptureListeners | Aggregated listeners used during this use case. See listeners section for more details. |
| numberOfPoints: Int | This parameter describes amount of points to be connected during the capture. |
| timeoutInSeconds Long | After given amount of seconds, capture finishes with timeour error. Default value is: 120 |
| securityLevel SecurityLevel | This parameter determines how restrictive liveness alghoritms are. Default value is: SecurityLevel.HIGH |
Listeners
LivenessActiveListener
This listener provides information about active face capture. This mode requires user to connect dots in correct order by moving his face. Callbacks tells integrator what is current status of challenge and what to display. Keep in mind that by providing UISettings to FaceCaptureView, there is no need to handle that because SDK will draw this challenge with style provided.
Kotlin1fun onPointerUpdate(pointInfo: PointerInfo)
PointerInfo contains information about user's "viewfinder" position. This is the point that user needs to put on a target in order to mark it as "captured".
Kotlin1fun onTargetUpdate(targetInfo: TargetInfo)
TargetInfo contains information about targets to capture.
Parameter | Description |
|---|---|
| x Int | X coordinate of target. |
| y Int | Y coordinate of target. |
| show Boolean | Indicates if target should be visible to user. |
| radius Int | Radius of target relative to capture frame size. |
| number Int | Number of target. |
| completness Float | Value ranged from 0.0 to 1.0, where 1.0 tells that target is fully captured. |
| current Boolean | Informs if given target is currently active one (to be captured). |
Kotlin1fun onNumberTargets(numberOfTargets: Int)
This callback provides information about how many points needs to be captured to pass challenge.
CaptureResultListener
Provides information about flow result.
Kotlin1fun onFinish(result: CaptureResult)
CaptureResult instance might be type of Success that is information about successful flow or Failure that contains Error instance inside. For more details see errors section.
FaceTrackingInfoListener
This listener provides rectangle coordinates and size with face position (relative to preview frame size) in real time during capture. Helpful when there is a need to draw overlay on preview showing detected face.
Kotlin1fun faceTrackingInfo(trackingInfo: FaceTrackingInfo)
CaptureFeedbackListener
This is listener with crucial information for user about the capture. Helps to find optimal position in front of camera.
Kotlin1fun onFeedback(captureFeedback: CaptureFeedback)
Where CaptureFeedback is enum with self-explanatory instruction. It is covered by UISettings* by mapping these to text instructions to the user.
PassiveLivenessUseCase
This use case performs face capture with on-device liveness verification. It means that no external requests are made in order to verify user. "Passive" in use case name indicate that in order to pass verification end user does not have to do any action - just place his face in front of the camera.
Use case should be created using its constructor:
Kotlin1PassiveLivenessUseCase (2 val listeners: ActiveCaptureListeners = ActiveCaptureListeners(),3 val timeoutInSeconds: Long = DEFAULT_TIMEOUT_SECONDS,4 val securityLevel: SecurityLevel = SecurityLevel.HIGH,5)
Parameter | Description |
|---|---|
| listeners ActiveCaptureListeners | Aggregated listeners used during this use case. See listeners section for more details. |
| timeoutInSeconds Long | After given amount of seconds, capture finishes with timeour error. Default value is: 120 |
| securityLevel SecurityLevel | This parameter determines how restrictive liveness alghoritms are. Default value is: SecurityLevel.HIGH |
Listeners
CaptureResultListener
Provides information about flow result.
Kotlin1fun onFinish(result: CaptureResult)
CaptureResult instance might be type of Success that is information about successful flow or Failure that contains Error instance inside. For more details see errors section.
FaceTrackingInfoListener
This listener provides rectangle coordinates and size with face position (relative to preview frame size) in real time during capture. Helpful when there is a need to draw overlay on preview showing detected face.
Kotlin1fun faceTrackingInfo(trackingInfo: FaceTrackingInfo)
CaptureFeedbackListener
This is listener with crucial information for user about the capture. Helps to find optimal position in front of camera.
Kotlin1fun onFeedback(captureFeedback: CaptureFeedback)
Where CaptureFeedback is enum with self-explanatory instruction. It is covered by UISettings* by mapping these to text instructions to the user.
Errors
For every flow there is possibility to receive Error type of result. It means that something went wrong during the capture or backend communication. Fortunately, Error object contains a lot of useful information that help to handle failed flow.
Error
Parameter | Description |
|---|---|
| type ErrorType | Type of an error. High level information what goes wrong. Find types description below. |
| code Int | Special code dedicated for particular case. Very helpful in L2, L3 troubleshooting. |
| message String | Message with error description. |
| unlockDateTime Long? | Time in "UTC" time zone when capture will be unblocked. This field have value when ErrorType is DEVICE_BLOCKED |
| failureReasons List | List of enums containing reasons of failure. |
ErrorType
Type | Description |
|---|---|
| CONNECTION_ISSUE | General issue with connection. See message and error code for more information. |
| AUTHENTICATION | Backend authentication failed. Probably wrong credentials has been used for the given environment. |
| INVALID_SESSION | Session ID is not correct. Most probably session expired or has been finished. |
| TIMEOUT | Timeout occurred during the flow. |
| BAD_CAPTURE | Capture failed. Face was not detected or liveness check did not pass. |
| UNKNOWN | Unknown type of exception. Also used as default type for few cases. |
| CANCELED | Flow has been canceled. Can be triggered by integrator or automatically when Lifecycle has been passed to setUp method. |
| VERIFICATION | Device signature verification failed. |
| INVALID_LICENSE | License validation failed. Make sure that it has been activated with LicenseManager |
| DEVICE_BLOCKED | Capture on this device got blocked for period of time, because of many failures. |
| LIVENESS_CHECK | Liveness verification failed during the capture. It can happen during offline capture use cases like: ActiveLivenessUseCase or PassiveLivenessUseCase |
FailureReason
Type | Description |
|---|---|
| FACE_NOT_DETECTED | Face was not detected. |
| INSUFFICIENT_SMILE | Smile was not detected (or was not genuine enough) during MLC capture. |
| INCORRECT_FACE_POSITION | Face was not correctly positioned within the frame. |
| TOO_DARK | It's too dark to perform the capture. |
| TOO_BRIGHT | It's too bright to perform the capture. |
Integration of MLC capture
MultidimensionalLivenessCheck is a recommended mode for liveness capture. This capture consist of three phases:
- Framing - when the user have to correctly align face within the frame.
- Smile - when the user needs to smile genuinely.
- Illumination - when face will be verified with a sequence of color flashes.
There are two ways of integrating this capture - with providing UiSettings, or by handling each step of the capture on your own.
Integration with using UiSettings
Using UiSettings is the easiest way of integrating MLC capture. It requires following steps:
- Create session with Liveness of type MLC. See creating capture session section for more details.
- Create RemoteUseCase with sessionId, EnvironmentInfo and listeners.
Kotlin1val remoteUseCase = RemoteUseCase(2 sessionId,3 RemoteCaptureListeners(4 stepInfoListener = stepInfoListener,5 captureResultListener = captureResultListener,6 ),7 environmentInfo8)
- Create mlcCaptureSettings with feedbacks specific for MLC and pass it to UiSettings object.
- Call
setUpon FaceCaptureView with previously created objects:
Kotlin1binding.captureView.setUp(remoteUseCase,2 lifecycle, //If you don't want to start and stop capture on your own3 UISettings(mlcCaptureSettings = mlcCaptureSettings),4 )
After that capture will be started.
Integration based on MlcListener
The second way of handling MLC capture is to implement your own UI and logic for handling each phase of the capture. It's more complex, but allows better customization than approach with using UiSettings. This integration is based on correctly handling information coming from MlcListener. As mentioned before, MLC capture consist of three phases:
- Framing - it requires correctly placing the face within the preview. To proceed, the user have to follow feedbacks coming from CaptureFeedbackListener.
- Smile - starts after receiving feedback CaptureFeedback.FACE_INFO_MAKE_A_SMILE. There are three methods in MlcListener related
with this phase:
onSmileStabilityChange- which can be used to track progress of whole phase,onSmileSizeChange- to show smile progress for the user (It can be done for example with using SmileIndicatorBar) andonSmileFinished- which means that smile phase ended. - Illumination - during this phase preview background have to change colors according to values coming from the SDK. To properly handle
this phase, you have to:
- Rescale FaceCaptureView with value received from
onIlluminationPreparedmethod. - Show some additional instructions for the user, for example informing about incoming color changes or necessity of moving face closer to the screen due to changed preview size.
- Trigger illumination process by calling
start()onIlluminationRequestreceived fromonIlluminationDemandmethod. - Adjust color of preview background to values coming from
onColorToDisplay. If you want to track progress of illumination phase, then progress will be returned inonIlluminationProgressChange(as value in range between 0.0 and 1.0). The process ends whenonIlluminationFinishedis called.
- Rescale FaceCaptureView with value received from
When MlcListener is implemented based on given instructions, then you must:
- Create screen with FaceCaptureView which does not cover all available space - because during illumination phase user's face should be
verified with sequence of a color flashes, and FaceCaptureView background have to be adjusted to colors from
onColorToDisplaycallback. - Create session with Liveness of type MLC. See creating capture session section for more details.
- Create RemoteUseCase with sessionId, EnvironmentInfo and listeners.
Kotlin1val remoteUseCase = RemoteUseCase(2 sessionId,3 RemoteCaptureListeners(4 stepInfoListener = stepInfoListener,5 captureFeedback = captureFeedbackListener,6 captureResultListener = captureResultListener,7 mlcListener = mlcListener8 ),9 environmentInfo10)
- Call
setUpon FaceCaptureView with previously created objects:
Kotlin1binding.captureView.setUp(remoteUseCase,2 lifecycle, //If you don't want to start and stop capture on your own3 null,4 )
Face capture - local
Creating a FaceCaptureHandler
These instructions will help you create a BioCapture handler.
- Retrieve a capture handler to perform all the biometric capture operations. You must first configure the capture options. For projects
that use Kotlin there are handlers from
com.idemia.smartsdk.capturethat support initializing capture preview with suspend method.
BioCaptureMode is now deprecated and should not be used during capture configuration because it will be removed in a future release.
-
Review the use cases named Capture biometrics.
-
Review all the features provided by the
BioCaputureHandlerhandler here.
1 val captureOptions = FaceCaptureOptions(FaceLiveness.PASSIVE).apply {2 camera = Camera.FRONT3 captureTimeout = 1204 overlay = Overlay.OFF5 }6 val captureHandler = FaceCaptureHandler(context, captureOptions)
Parameter | Description |
|---|---|
| activity Activity | The Android activity. |
| options IFaceCaptureOptions | The capture options to configure the bio capture handler. |
| callbacks BioCaptureAsyncCallbacks | Callbacks to be executed depending on the result. |
Errors
Error code | Description |
|---|---|
MSC_ERR_APPLINOTAVAILABLE | The application parameter is not available. |
MSC_ERR_GRAPH_INITIALISATION_FAILED | The graph initialization failed. |
MSC_ERR_INIT | Initialization failed. |
MSC_ERR_PARAMETERS | Parameters are invalid. |
MSC_ERR_PARAMETER_NOT_FOUND | Parameter is missing. |
MSC_ERR_PARAMETER_SIZE | Parameter size is incorrect. |
MSC_ERR_PARAMETER_UNKNOWN | One of the parameters is unknown. |
MSC_ERR_INVALID_HANDLE | Handle is invalid. |
LIBS_NOT_FOUND | Java libraries are not found. |
NO_CONTEXT_SET | Java context is not set. |
NOT_EXECUTED | Java is unable to execute. |
MSC_ERR_LICENSE | License is invalid. |
MSC_ERR_MEMALLOC | Memory allocation issue. |
MSC_ERR_PROFILENOTAVAILABLE | BioCapture profile is not available. |
MSC_ERR_SUBPROFILENOTAVAILABLE | BioCapture sub-profile is not available. |
MSC_ERR_TYPE_MISMATCH | BioCapture type mismatch. |
UNKNOWN | Unknown error |
Handlers
This section discusses the BioCapture handler, FaceCapture handler and BioMatcher handler.
BioCapture handler
You must retrieve the capture handler through the Biometric Capture SDK entry point.
Face listener
This sets the listener to receive feedback (such as when a user moves their face to the right) as shown in the snippet:
Java1captureHandler.setFaceTrackingListener(new FaceCaptureTrackingListener() {2 @Override3 public void onTracking(List<FaceTracking> trackingInfo) {4 //Tracking info to know where the face is.5 }6 });
Start preview
This asynchronously starts the camera preview. It is recommended to start the capture once the preview has been initialized, as shown in the snippet:
Java1handler.startPreview(new PreviewStatusListener() {2 @Override3 public void onStarted() {4 try {5 captureHandler.startCapture();6 } catch (MSCException e) {7 // handle exception8 }9 }1011 @Override12 public void onError(PreviewError error) {13 // Preview initialization failed and can not be started14 }15 });
Kotlin1coroutineScope.launch {2 handler.startPreview()3 handler.startCapture()4}
Stop preview
This stops the camera preview as shown in the snippet:
Java1handler.stopPreview();
Start capture
This starts the biometric capture as shown in the snippet.
Java1handler.startCapture();
Stop capture
This stops the biometric capture as shown in the snippet:
Java1handler.stopCapture();
Switch camera
This switches between different cameras as shown in the snippet:
Java1handler.switchCamera(Camera.FRONT); // Use front camera2handler.switchCamera(Camera.REAR); // Use rear camera
Destroy
This releases all the handler resources as shown in the snippet:
Java1handler.destroy();
Overlay
This sets the overlay option.
Java1handler.setOverlay(Overlay.OFF); // Disable preview's overlay2handler.setOverlay(Overlay.ON); // Enable preview's overlay
CaptureOptions
This retrieves the capture options used in this handler as shown in the snippet:
Java1ICaptureOptions options = handler.getCaptureOptions();
Force capture
This forces a capture as shown in the snippet:
Java1handler.forceCapture();
Capture handler status
Note: Check CaptureHandlerStatus.
This retrieves the status of the capture handler as shown in the snippet:
Java1CaptureHandlerStatus captureHandlerStatus = handler.getCaptureStatus();
FaceCapture handler
Note: It extends from BioCaptureHandler.
You must retrieve the capture handler through the Biometric Capture SDK entry point for BioCaptureHandler, as shown in the snippet:
Java1// Get activity from application2Activity activity = ...3// Populate a CaptureOptions object4IFaceCaptureOptions captureOptions = new FaceCaptureOptions(FaceLiveness.PASSIVE);5captureOptions.setFaceLivenessSecurityLevel(FaceLivenessSecurityLevel.HIGH);6captureOptions.setCamera(Camera.FRONT);7captureOptions.setCaptureTimeout(120);8captureOptions.setOverlay(Overlay.OFF);9BioSdk.createFaceCaptureHandler(activity, captureOptions, new MscAsyncCallbacks<IFaceCaptureHandler>() {10 @Override11 public void onPreExecute() {12 // Optional hook on the builtin Android AsyncTask call-back `onPreExecute`13 }1415 @Override16 public void onSuccess(IFaceCaptureHandler faceCaptureHandler) {17 // Indicates that initialization succeeded, the returned handler can be used to start the capture.18 handler = faceCaptureHandler;19 //handler.setTotalNumberOfCapturesBeforeDelay(-1); to disable delays between face capture failures.20 }2122 @Override23 public void onError(BioCaptureHandlerError e) {24 // An error has occurred during the initialization25 }26});
Capture result listener
This sets the listener to receive the face captures. The face image callback will be fired whenever the capture is finished, as shown in the snippet:
Java1handler.setFaceCaptureResultListener(new FaceCaptureResultListener() {2 @Override3 public void onCaptureSuccess(@NotNull FaceImage image) {4 }56 @Override7 public void onCaptureFailure(@NotNull CaptureError captureError,8 @NotNull IBiometricInfo biometricInfo,9 @NotNull Bundle extraInfo) {10 }11 });
onCaptureSuccess | Called when captured is finished successfully |
|---|---|
| image FaceImage | Capture face image |
FaceImage | |
|---|---|
| getLivenessResult FaceLivenessResult | Resolution of capture liveness: LIVE,FAKE, or NO_DECISION |
| getMetadata Metadata | Low level data needed for verification or debug |
FaceImage extends IImage, so it is possible to call getImageQuality() on it. However it is not recommended, as imageQuality
is only available for finger capture and this method will always return -1 for FaceImage.
onCaptureFailure | Called when capture failed |
|---|---|
| captureError CaptureError | Reason of capture failure |
| biometricInfo IBiometricInfo | Biometric information about location and classification |
| extraInfo Bundle | Holds capture extra info: capture delay date |
Use CR2D challenges
This is another type of challenges which contains target points and points controlled by the user. To use it, pass FaceLiveness.ACTIVE to
the FaceCaptureOptions constructor.
This example sets CR2D in capture options as shown in the snippet:
Java1FaceCaptureOptions options = new FaceCaptureOptions(FaceLiveness.ACTIVE);
Use passive liveness challenge
Passive mode checks for liveness without user interaction (no head movement required). As in default mode, it requires only to show the
face in front of the camera so that an image can be acquired. Special algorithms estimate if a user is a real person or not. To use this
mode, pass FaceLiveness.PASSIVE to FaceCaptureOptions constructor.
This example sets Passive in the capture options as shown in the snippet"
Java1FaceCaptureOptions options = new FaceCaptureOptions(FaceLiveness.PASSIVE);
Get debug data
You can save some capture data on the user device's memory. In some cases, keeping those files might help to solve issues.
Below is an example of how to configure the debug data options. The data can be found on the SD card in the SmartSDK_debug_data directory.
An example is shown in the snippet:
Java1[...]2 DebugSettingsBuilder debugSettingsBuilder = new DebugSettingsBuilder();3 debugSettingsBuilder.logLevel(logLevel)4 .storingType(DataStoringType.LAST_SESSION_ONLY)5 .recordRtv(DebugOption.DISABLED)6 .recordPostMortemRtv(DebugOption.DISABLED)7 .saveCapturedImages(DebugOption.DISABLED);8 captureOptions.setDebugDataSettings(debugSettingsBuilder.build());
Note: DataStoringType might have two values: LAST_SESSION_ONLY or MULTIPLE_SESSIONS. The first overwrites data in a single
directory. The second makes a separate directory per capture.
An option exists to store special .rtv files that help you understand what is happening during a capture.
Note: Storing these files takes a lot of space. LogLevel describes what part of the logs will be saved to a file. If needed, the
integrator can also save captured images by enabling saveCapturedImages option.
Set maximum captures before delay
This field sets the maximum number of captures before preventing a capture.
Values less than or equal to 0 disable the functionality. Values greater than 0 set the number of attempts before blocking.
The default value is 5 as shown in the snippet:
Java1((FaceCaptureHandler)handler).setMaxCapturesBeforeDelay(5);
There is also a getter for this value as shown in the snippet:
Java1((FaceCaptureHandler)handler).getMaxCapturesBeforeDelay();
Set capture delay time array
This sets the array list with capture delay for failed attempts that will happen after maxCapturesBeforeDelay.
Delay for the next attempt is taken from the arrays as timeCaptureDelayArray[n maxCapturesBeforeDelay].
For all the attempts after the array length, the last item is taken as shown in the snippet:
Java1List<Long> delayTimes = Arrays.asList(1L, 5L, 10L, 30L, 60L);2((FaceCaptureHandler)captureHandler).setTimeCaptureDelayArray(delayTimes);
Get time to unlock capture
This provides information about the delay time before the user can retry (specified in seconds). A return value of 0 means that the
capture is not blocked.
An example request is shown in the snippet:
Java1((FaceCaptureHandler)handler).timeToUnlock();
Get liveness captures attempts left before delay
This provides information about the number of captures that can be completed before delay is initialized.
It returns the number of attempts before the capture will be blocked, as shown in the snippet:
Java1handler.captureAttemptsLeft();
It returns 0 if the capture is blocked, and Int.MAX_VALUE if the capture delays are turned off.
Liveness security levels
In IFaceCaptureOptions you can set the liveness security strength. It is configured via the FaceLivenessSecurityLevel enum.
The liveness security levels are:
- LOW
- MEDIUM
- HIGH recommended
An option exists to store special .rtv files that help you understand what happens during a capture.
Compression recommendations
Selfie images
- Recommended compression is JPEG90
- Size of image will be about 100 KB
BioStore
The use of this component is optional. Its purpose is to allow the integrator to easily persist templates.
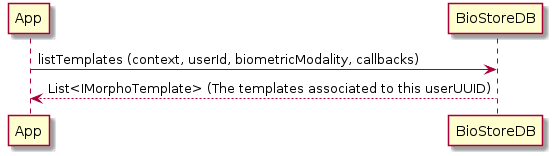
Query templates by userUUID
This lists the templates stored in the repository filtering by user.

Java1BioStoreDB.listTemplates(context, userId, new DataBaseAsyncCallbacks<List<IMorphoTemplate>>() {2 @Override3 public void onPreExecute() {4 // Optional hook on the builtin Android AsyncTask callback `onPreExecute`5 }67 @Override8 public void onSuccess(List<IMorphoTemplate> result) {9 //The list of templates that match the criteria.10 }1112 @Override13 public void onError(Exception e) {14 // An error has occurred.15 }16 });
Function
Java1public static void listTemplates(final Context context, final UUID userId, DataBaseAsyncCallbacks<List<IMorphoTemplate>> callbacks);
Parameter | Description |
|---|---|
| context Context | The Android context. |
| userId UUID | The user identifier. |
| callbacks DataBaseAsyncCallbacks | Callbacks to be executed depending on the result. |
Errors
You will receive an exception reporting the error.
Query templates by userUUID and modality
This lists the templates stored in the repository filtering by User and BiometricModality.
Java1BioStoreDB.listTemplates(context, userId, biometricModality, new DataBaseAsyncCallbacks<List<IMorphoTemplate>>() {2 @Override3 public void onPreExecute() {4 // Optional hook on the builtin Android AsyncTask callback `onPreExecute`5 }67 @Override8 public void onSuccess(List<IMorphoTemplate> result) {9 //The list of templates that match the criteria.10 }1112 @Override13 public void onError(Exception e) {14 // An error has occurred.15 }16 });
Function
Java1void listTemplates(final Context context, final UUID userId, final BiometricModality biometricModality, DataBaseAsyncCallbacks<List<IMorphoTemplate>> callbacks);
Parameter | Description |
|---|---|
| context Context | The Android context. |
| userId UUID | The user id. |
| biometricModality BiometricModality | The BiometricModality enum option. |
| callbacks DataBaseAsyncCallbacks | Callbacks to be executed depending on the result. |
Errors
You will receive an exception reporting the error.
Add template
This stores a template in the repository. If there is a previous template with the same user UUID, Biometric location, and Biometric modality, it will be updated and the UUID returned.
Note: You cannot have two templates with the same configuration.

Java1BioStoreDB.addTemplate(context, morphoTemplate, new DataBaseAsyncCallbacks<UUID>() {2 @Override3 public void onPreExecute() {4 // Optional hook on the builtin Android AsyncTask callback `onPreExecute`5 }67 @Override8 public void onSuccess(UUID result) {9 //The template has been added and the template's uuid is returned as a parameter.10 }1112 @Override13 public void onError(Exception e) {14 // An error has occurred.15 }16 });
Function
Java1public static void addTemplate(final Context context, final IMorphoTemplate template, DataBaseAsyncCallbacks<UUID> callbacks);
Parameter | Description |
|---|---|
| context Context | The Android context. |
| template IMorphoTemplate | The template to be stored. |
| callbacks DataBaseAsyncCallbacks | Callbacks to be executed depending on the result. |
Errors
You will receive an exception reporting the error.
Update template
This updates a template in the repository.
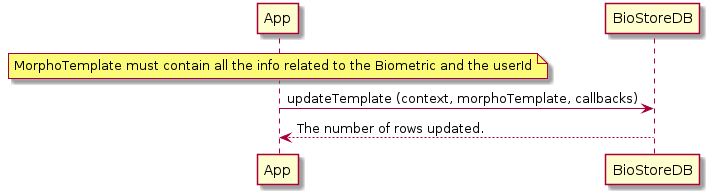
Java1BioStoreDB.updateTemplate(context, morphoTemplate, new DataBaseAsyncCallbacks<Void>() {2 @Override3 public void onPreExecute() {4 // Optional hook on the builtin Android AsyncTask callback `onPreExecute`5 }67 @Override8 public void onSuccess(Void result) {9 //updated.10 }1112 @Override13 public void onError(Exception e) {14 // An error has occurred.15 }16});
Function
Java1void updateTemplate(final Context context, final IMorphoTemplate template, DataBaseAsyncCallbacks<Void> callbacks);
Parameter | Description |
|---|---|
| context Context | The Android context. |
| template IMorphoTemplate | The template to be updated. |
| callbacks DataBaseAsyncCallbacks | Callbacks to be executed depending on the result. |
Errors
You will receive an exception reporting the error.
Remove template
This removes a template from the repository.
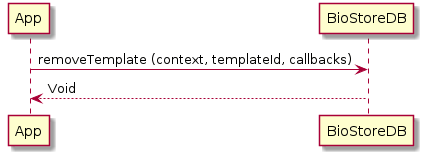
Java1BioStoreDB.removeTemplate(context, templateId, new DataBaseAsyncCallbacks<Void>() {2 @Override3 public void onPreExecute() {4 // Optional hook on the builtin Android AsyncTask callback `onPreExecute`5 }67 @Override8 public void onSuccess(Void result) {9 //The template was removed.10 }1112 @Override13 public void onError(Exception e) {14 // An error has occurred.15 }16 });
Function
Java1void removeTemplate(final Context context, final UUID templateId, DataBaseAsyncCallbacks<Void> callbacks);
Parameter | Description |
|---|---|
| context Context | The Android context. |
| templateId UUID | The template id to be removed. |
| callbacks DataBaseAsyncCallbacks | Callbacks to be executed depending on the result. |
Errors
You will receive an exception reporting the error.
Remove templates associated to one userUUID
This removes the templates associated to the user identifier from the repository.
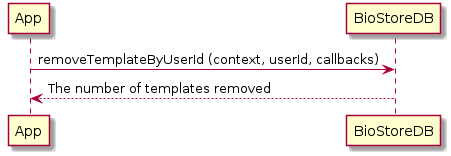
Java1BioStoreDB.removeTemplateByUserId(context, userId, new DataBaseAsyncCallbacks<Integer>() {2 @Override3 public void onPreExecute() {4 // Optional hook on the builtin Android AsyncTask callback `onPreExecute`5 }67 @Override8 public void onSuccess(Integer result) {9 //The number of templates removed.10 }1112 @Override13 public void onError(Exception e) {14 // An error has occurred.15 }16 });
Function
Java1void removeTemplateByUserId(final Context context, final UUID userId, DataBaseAsyncCallbacks<Integer> callbacks);
Parameter | Description |
|---|---|
| context Context | The Android context. |
| userId UUID | The user id. |
| callbacks DataBaseAsyncCallbacks | Callbacks to be executed depending on the result. |
Errors
You will receive an exception reporting the error.
Retrieve template
This retrieves a template from the database.
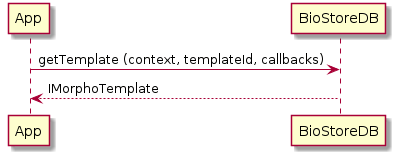
Java1BioStoreDB.getTemplate(context, templateId, new DataBaseAsyncCallbacks<IMorphoTemplate>() {2 @Override3 public void onPreExecute() {4 // Optional hook on the builtin Android AsyncTask callback `onPreExecute`5 }67 @Override8 public void onSuccess(IMorphoTemplate result) {9 //The template if exists.10 }1112 @Override13 public void onError(Exception e) {14 // An error has occurred.15 }16 });
Function
Java1void getTemplate(final Context context, final UUID templateId, DataBaseAsyncCallbacks<MorphoTemplate> callbacks);
Parameter | Description |
|---|---|
| context Context | The Android context. |
| templateId UUID | The template id. |
| callbacks DataBaseAsyncCallbacks | Callbacks to be executed depending on the result. |
Errors
You will receive an exception reporting the error.
Clear database
This clears all the data stored in the database.
Java1BioStoreDB.clear(context, new DataBaseAsyncCallbacks<Void>() {2 @Override3 public void onPreExecute() {4 // Optional hook on the builtin Android AsyncTask callback `onPreExecute`5 }67 @Override8 public void onSuccess(Void result) {9 //Data has been cleared10 }1112 @Override13 public void onError(Exception e) {14 // An error has occurred15 }16 });
Function
Java1void clear(final Context context, DataBaseAsyncCallbacks<Void> callbacks);
Parameter | Description |
|---|---|
| context Context | The Android context. |
| callbacks DataBaseAsyncCallbacks | Callbacks to be executed depending on the result. |
Errors
You will receive an exception reporting the error.
Add user
This adds a new user to the database.
Java1IUser user = new User();2 user.setName("Jose");3 BioStoreDB.addUser(context, user, new DataBaseAsyncCallbacks<UUID>() {4 @Override5 public void onPreExecute() {6 // Optional hook on the builtin Android AsyncTask callback `onPreExecute`7 }89 @Override10 public void onSuccess(UUID result) {11 //User saved12 }1314 @Override15 public void onError(Exception e) {16 // An error has occurred17 }18 });
Function
Java1void addUser(final Context context, final IUser user, DataBaseAsyncCallbacks<UUID> callbacks);
Parameter | Description |
|---|---|
| context Context | The Android context. |
| user IUser | The user. |
| callbacks DataBaseAsyncCallbacks | Callbacks to be executed depending on the result. |
Errors
You will receive an exception reporting the error.
Update user
This updates a user in the database.
Java1IUser user = ... //retrieve old user2 BioStoreDB.updateUser(context, user, new DataBaseAsyncCallbacks<Void>() {3 @Override4 public void onPreExecute() {5 // Optional hook on the builtin Android AsyncTask callback `onPreExecute`6 }78 @Override9 public void onSuccess(Void result) {10 //User updated.11 }1213 @Override14 public void onError(Exception e) {15 // An error has occurred.16 }17 });
Function
Java1void updateUser(final Context context, final IUser user, DataBaseAsyncCallbacks<Void> callbacks);
Parameter | Description |
|---|---|
| context Context | The Android context. |
| user IUser | The user. |
| callbacks DataBaseAsyncCallbacks | Callbacks to be executed depending on the result. |
Errors
You will receive an exception reporting the error.
Remove user
This removes a user from the database.
Java1BioStoreDB.removeUser(context, uuid, new DataBaseAsyncCallbacks<Void>() {2 @Override3 public void onPreExecute() {4 // Optional hook on the builtin Android AsyncTask callback `onPreExecute`5 }67 @Override8 public void onSuccess(Void result) {9 //User removed10 }1112 @Override13 public void onError(Exception e) {14 // An error has occurred15 }16 });
Function
Java1void removeUser(final Context context, final UUID uuid, DataBaseAsyncCallbacks<Void> callbacks);
Parameter | Description |
|---|---|
| context Context | The Android context. |
| uuid UUID | The user uuid. |
| callbacks DataBaseAsyncCallbacks | Callbacks to be executed depending on the result. |
Errors
You will receive an exception reporting the error.
Get user
This retrieves a user from the database.
Java1BioStoreDB.getUser(context, uuid, new DataBaseAsyncCallbacks<IUser>() {2 @Override3 public void onPreExecute() {4 // Optional hook on the builtin Android AsyncTask callback `onPreExecute`5 }67 @Override8 public void onSuccess(IUser result) {9 //User10 }1112 @Override13 public void onError(Exception e) {14 // An error has occurred15 }16 });
Function
Java1void getUser(final Context context, final UUID uuid, DataBaseAsyncCallbacks<IUser> callbacks);
Parameter | Description |
|---|---|
| context Context | The Android context. |
| uuid UUID | The user uuid. |
| callbacks DataBaseAsyncCallbacks | Callbacks to be executed depending on the result. |
Errors
You will receive an exception reporting the error.
List users
List the users stored in the repository.
Java1BioStoreDB.listUsers(context, new DataBaseAsyncCallbacks<List<IUser>>() {2 @Override3 public void onPreExecute() {4 // Optional hook on the builtin Android AsyncTask callback `onPreExecute`5 }67 @Override8 public void onSuccess(List<IUser> result) {9 //Users10 }1112 @Override13 public void onError(Exception e) {14 // An error has occurred15 }16 });
Function
Java1void listUsers(final Context context, DataBaseAsyncCallbacks<List<IUser>> callbacks);
Parameter | Description |
|---|---|
| context Context | The Android context. |
| callbacks DataBaseAsyncCallbacks | Callbacks to be executed depending on the result. |
Errors
You will receive an exception reporting the error.
Helper objects
BioSdk class - enableAnalytics
This method turns on the reporting and sending analytics report. It also changes the analytics server and its API key.
NOTE: The server is set to Europe by default.
Parameter | Description |
|---|---|
| network Network | Preferred network type that will be used to send the report. |
| analyticsConfigurationData AnalyticsConfigurationData | Class that allows the setting of SERVER URL and API KEY. |
BioSdk class - disableAnalytics
This turns off the reporting and sending analytics report.
Note: By default, the analytics mechanism is turned on and the server is set to Europe.
This section describes the helper objects that are necessary to use the Biometric Capture SDK.
MscAsyncCallbacks
Generic callbacks which execute task asynchronous.
Function
Kotlin1fun onPreExecute() {23}
Function
Kotlin1fun onSuccess(result: T) {2 //on success3}
Arguments
Parameter | Description |
|---|---|
| result T | return on success with result type set when callback was created |
Function
Kotlin1fun onError(e: BioCaptureHandlerError) {2 //on success3}
Arguments
Parameter | Description |
|---|---|
| e BioCaptureHandlerError | An error |
BioSdk class - IBioSdkInfo
This object exposes information about the SDK. An example snippet is shown:
Java1IBioSdkInfo sdkInfo = BioSdk.getInfo();
Parameter | Description |
|---|---|
version String | The version of the SDK |
IBioMatcherSettings
This object is used to configure the behavior of BioMatcher.
Attribute | Description |
|---|---|
| debugDataSettings DebugDataSettings | Sets options used for preparing debug data dump |
fingerTemplateFormat MorphoFingerTemplateFormat | Finger template format, only used for fingerprints—default format is PKLITE |
ICaptureOptions
This object is used to configure the behavior of Capture.
Attribute | Description |
|---|---|
| camera Camera | The app camera option to configure BioCapture. |
| overlay Overlay | Sets the overlay value. |
| captureTimeout Long | Capture timeout in seconds (default value 120). |
| logLevel LogLevel | Sets the log level. |
| DebugDataSettings Debug Data | Sets debug data options that stores key information about capture on the device's memory. |
FaceCaptureOptions
This object used to configure the behavior of FaceCapture. It extends from CaptureOptions.
Attribute | Description |
|---|---|
| seed int | For CR2D sets dots seed |
| liveness FaceLiveness | Set challenge for face |
| securityLevel FaceLivenessSecurityLevel | Set liveness security |
| videoRecordingOptions VideoRecordingOptions | When enabled, CaptureSDK returns VideoRecording to generate video from a taken capture. (By default video recording is turned off) |
IBiometricSet
This is a common interface that all the candidates and references that perform authentication and identification operations extend.
Parameter | Description |
|---|---|
templates List<IMorphoTemplate> | The Biometric templates; refer to IMorphoTemplate |
| biometricModality BiometricModality | The BiometricModality enum option. |
IBiometricCandidate
This is a common interface that all the candidates extend. It extends IBiometricSet.
IBiometricReference
This is a common interface that all the references used to perform an authentication or identification extend. It extends IBiometricSet.
Parameter | Description |
|---|---|
| userUuid UUID | User uuid |
IBiometricInfo
This is a common interface that all the different Biometrics implement.
Parameter | Description |
|---|---|
| biometricLocation BiometricLocation | The BiometricLocation enum option. |
| biometricModality BiometricModality | The BiometricModality enum option. |
BiometricInfo
This is a common object that all the different Biometrics extend. It implements the interface IBiometricInfo.
IImage
This is the image interface that the SDK image objects extend.
Parameter | Description |
|---|---|
buffer byte[] | The image. |
stride int | The stride of the biometric. |
width long | The width of the image. |
height long | The height of the image. |
| colorSpace ColorSpace | The ColorSpace of the image. |
resolution float | The resolution of the image. |
imageQuality int | Image quality if available, otherwise -1. Currently only available for fingerprint images. |
| label | Label associated with this image, if any. It can be 'null' |
toJPEG byte[] | Retrieves the image as a JPEG image. Default quality for that document is 70%. The created JPEG for the document will contain capture maker note data inside EXIF metadata, containing information such as the SDK version used for capturing the image. |
toJPEG(float quality) | Retrieves the image as a JPEG image with quality valued from '0' to '1' |
MorphoImage
This is the image object returned by the SDK. It extends BiometricInfo and implements IImage.
Metadata
This is low level data information about capture for verification.
Description | |
|---|---|
getData() byte[] | The information about capture. |
encrypt(String random, List<String> certificates) EncryptedData | The encrypted data. |
EncryptedData
This is low level encrypted data information about Capture for verification.
Parameter | Description |
|---|---|
data byte[] | The information about capture. |
encryptedMaster byte[] | The encrypted master key. |
EncryptedMetadata
This is low level encrypted data information about Capture for verification.
Function name | Description |
|---|---|
getEncryptedData() byte[] | The information about capture. |
FaceTracking
This is a face tracking object returned by the FaceCaptureTrackingListener.
Parameter | Description |
|---|---|
rect Rect | The position of the biometric. |
previewRect Rect | The original preview size to which the coordinates are referred. |
OvalOverlay
Information about oval overlay that might help user to position face correctly in front of camera. Keep in mind these numbers are relative to preview image size. If you want to display some UI elements helping user to place his face, using UIExtensions library is recommended. Otherwise you have to rescale these coordinates by your own to fit your view.
Parameter | Description |
|---|---|
width float | The width length of the oval. |
height float | The height length of the oval. |
centerX float | The position x of oval center. |
centerY float | The position y of oval center. |
IMorphoTemplate
This is the biometric template object returned by the SDK. It extends IBiometricInfo.
Parameter | Description |
|---|---|
buffer byte[] | The template. |
uuid UUID | The template uuid in the database (Can be null). |
uuidUser UUID | The user uuid (Can be null). |
IMorphoFaceTemplate
This is the biometric face template object returned by the SDK. It extends IMorphoTemplate.
Parameter | Description |
|---|---|
eyesPosition List<IEyePosition> | The eyes position; refer to IEyePosition |
templateFormat MorphoFaceTemplateFormat | The template format; refer to MorphoFaceTemplateFormat. |
qualityRawValue short | |
| quality FaceTemplateQuality |
IEyePosition
This is the position of eyes on face.
Parameter | Description |
|---|---|
getPosition RectF | The eye position. |
CaptureListener
This is a generic capture listener.
onCaptureFinish
This is invoked by BioCapture when the capture finishes.
Function
An example snippet is shown:
Java1void onCaptureFinish();
BioCaptureCR2DListener
This listener receives information about CR2D challenge objects.
onCurrentUpdated
This is called every time the current point changes. Cr2dCurrentPoint is an object with information about user position during the
challenge.
Java1void onCurrentUpdated(Cr2dCurrentPoint currentPoint);
onTargetUpdated
This is called every time the target changes. Cr2dTargetPoint is the object with information about a specific target in a challenge. Each
target has a unique number. This method is called once per specific target update.
Java1void onTargetUpdated(Cr2dTargetPoint targetPoint);
onTargetsConditionUpdated
This is called every time the condition of targets changes, where targetCount is the amount of all targets in a
challenge. targetStability is the stability for the current target in a challenge (possible value is from 0 to 100).
Java1void onTargetsConditionUpdated(int targetCount, int targetStability);
FaceCaptureFeedbackListener
This is the capture feedback listener. It enables the app to receive feedback about the biometric captures, like moving your head to the left.
onCaptureInfo
This is invoked multiple times by BioCapture to send feedback about the capture process to the app.
Function
An example snippet is shown.
Java1void onCaptureInfo(FaceCaptureInfo captureInfo);
Arguments
Parameter | Description |
|---|---|
| faceCaptureInfo FaceCaptureInfo | The feedback. |
IDetectBiometricOptions
This interface represents the verification options. This interface extends IBiometricInfo.
Parameter | Description |
|---|---|
| isTemplateCompressionEnabled boolean | Enables or disables the template compression. For the moment this feature is only available for face. |
IMatchingOptions
This interface represents the basic matching options.
Parameter | Description |
|---|---|
| biometricModality BiometricModality | The BiometricModality enum option |
IAuthenticationOptions
This is the interface that represents the authentication options. This interface extends IMatchingOptions.
The matching result is a score that reflects the similarity of two biometrics acquisitions. The threshold is the score value that is used
to differentiate a HIT from a NOHIT.
Threshold choice is a compromise between FAR (False Acceptance Rate) and FRR (False Reject Rate).
FAR is the proportion of requests that generate an unexpected HIT with two biometrics acquisitions of two different persons.
FRR is the proportion of requests that generate an unexpected NOHIT with two biometrics acquisitions of the same person.
IDEMIA algorithms
The recognition algorithm similarity matching score is linked with the FAR (as previously defined):
FAR | Score |
|---|---|
| 1% | 2500 |
| 0.1% | 3000 |
| 0.01% | 3500 |
| 0.001% | 4000 |
| 0.0001% | 4500 |
| 0.00001% | 5000 |
Parameter | Description |
|---|---|
| threshold long | The authentication threshold to be considered valid. |
IAuthenticationResult
This is the interface that represents an authentication result.
Parameter | Description |
|---|---|
score long | The authentication score (between 0 - 50000). |
| authenticationStatus AuthenticationStatus | The authentication status. |
IIdentificationOptions
This is the interface that represents the identification options. This interface extends IMatchingOptions.
IIdentificationResult
This is the interface that represents an identification result.
Parameter | Description |
|---|---|
candidateList List<IIdentificationCandidate> | The authentication result; refer to IIdentificationCandidate. |
IIdentificationCandidate
This is the Interface that represents a candidate result.
Parameter | Description |
|---|---|
uuid UUID | The candidate uuid. |
score long | The identification score result. |
VideoRecordingReadyForGenerationListener (Only for Face capture and RemoteFace capture)
This sets the listener for to get a VideoRecording. This listener is called when recording is enabled. It is called on successful and failed capture.
Setting callback
Java1captureHandler.setVideoRecordingReadyForGenerationListener(new VideoRecordingReadyForGenerationListener() {2 @Override3 public void videoRecordingReadyForGeneration (VideoRecording videoRecording){4 //Video recording object to generate video5 }6});
Callback returns VideoRecording object to generate video from capture.
VideoRecordingOptions
This object is used to configure the behavior of the VideoRecording. You cannot generate two or more videos at the same time.
Parameter | Description |
|---|---|
recordingEnable boolean | Enable video recording |
VideoRecording
This object is used to generate video in MP4 format. On success, it return the path to the video. You can generate one video.
Java1videoRecording.generateVideo(new VideoProgressListener() {234 @Overide5 void onFinish(String path) {6 //When creating video comlete with success return path to video7 }89 @Overide10 void progress(int progress) {11 //Showing progress of generating video from 0 to 10012 }1314 @Overide15 void onError(VideoError error) {16 //It's call when generating video failed or another video is current generating17 }18});
BioMatcher handler
This interface provides all the necessary helper methods to perform all the matching, identifying, and template coding operations.
Authenticate
This verifies a list of candidate templates against a list of reference templates. This method can be used to authenticate users.
Note: Review the use cases named Authenticate.
An example snippet is shown:
Java1//Authentication options2IAuthenticationOptions authenticationOptions = new AuthenticationOptions();3authenticationOptions.setThreshold(3500);45//Biometric candidate6IBiometricCandidate biometricCandidate = new BiometricCandidate(BiometricModality.FACE);7//We add all the templates for this candidate8biometricCandidate.addTemplates(candidates);910//Biometric references11IBiometricReference biometricReference = new BiometricReference(user.getUuid(), BiometricModality.FACE);12//We add all the templates for this user13biometricReference.addTemplates(references);1415matcherHandler.authenticate(authenticationOptions, biometricCandidate, biometricReference, new BioMatcherAsyncCallbacks<IAuthenticationResult>() {16 @Override17 public void onPreExecute() {18 // Optional hook on the builtin Android AsyncTask callback `onPreExecute`19 }2021 @Override22 public void onSuccess(IAuthenticationResult result) {23 //The result of the authentication24 long resultScore = result.getScore();25 //authentication status (FAILURE, SUCCESS...)26 AuthenticationStatus authenticationStatus = authenticationResult.getStatus();27 }2829 @Override30 public void onError(Exception e) {31 // An error has occurred32 }33});
Function
Java1void authenticate(IAuthenticationOptions authenticationOptions, IBiometricCandidate biometricCandidate, IBiometricReference biometricReference, BioMatcherAsyncCallbacks<IAuthenticationResult> callbacks);
Parameter | Description |
|---|---|
| authenticationOptions IAuthenticationOptions | The options used to perform the authentication. |
| biometricCandidate IBiometricCandidate | It contains the list of templates that you want to match. |
| biometricReference IBiometricReference | It contains the list of templates that you want to use as reference, each of one has the userUUID to which they belong. |
| callbacks BioMatcherAsyncCallbacks | Callbacks to be executed depending on the result; refer to IAuthenticationResult. |
Errors
You will receive an exception reporting the error.
Authenticate synchronous
This verifies a list of candidate templates against a list of reference templates. This method can be used to authenticate users.
Note: This function must be executed in a different thread than the UI. Check the use cases named Authenticate.
An example snippet is shown:
Java1//Authentication options2IAuthenticationOptions authenticationOptions = new AuthenticationOptions();3authenticationOptions.setThreshold(3500);45//Biometric candidate6IBiometricCandidate biometricCandidate = new BiometricCandidate(BiometricModality.FACE);7//We add all the templates for this candidate8biometricCandidate.addTemplates(candidates);910//Biometric references11IBiometricReference biometricReference = new BiometricReference(user.getUuid(), BiometricModality.FACE);12//We add all the templates for this user13biometricReference.addTemplates(references);1415IAuthenticationResult result = matcherHandler.authenticate(authenticationOptions, biometricCandidate, biometricReference);16//The result of the authentication17long resultScore = result.getScore();18//authentication status (FAILURE, SUCCESS...)19AuthenticationStatus authenticationStatus = authenticationResult.getStatus();
Function
An example snippet is shown.
Java1IAuthenticationResult authenticate(IAuthenticationOptions authenticationOptions, IBiometricCandidate biometricCandidate, IBiometricReference biometricReference);
Parameter | Description |
|---|---|
| authenticationOptions IAuthenticationOptions | The options used to perform the authentication. |
| biometricCandidate IBiometricCandidate | Contains the list of templates that you want to match. |
| biometricReference IBiometricReference | Contains the list of templates that you want to use as reference; each has the userUUID to which they belong. |
Errors
You will receive an exception reporting the error.
Identify
This method can be used to identify users. It identifies the user from the list of candidate templates that are matched against the list of reference templates.
Note: Check the use case named Identify.
An example snippet is shown:
Java1//Identification options2IIdentificationOptions identificationOptions = new IdentificationOptions();34//Biometric candidate5IBiometricCandidate biometricCandidate = new BiometricCandidate(BiometricModality.FACE);6//We add all the templates for this candidate7biometricCandidate.addTemplates(candidates);89//We create the list of references10ArrayList<IBiometricReference> biometricReferences = new ArrayList<IBiometricReference>();11//Biometric reference for one user12IBiometricReference biometricReference = new BiometricReference(user.getUuid(), BiometricModality.FACE);13//We add all the templates for this user14biometricReference.addTemplates(references);1516//We add the user to the list17biometricReferences.add(biometricReference);1819matcherHandler.identify(identificationOptions, biometricCandidate, biometricReferences, new BioMatcherAsyncCallbacks<IIdentificationResult>() {20 @Override21 public void onPreExecute() {22 // Optional hook on the builtin Android AsyncTask callback `onPreExecute`23 }2425 @Override26 public void onSuccess(IIdentificationResult result) {27 //The identification result28 List<IIdentificationCandidate> candidates = result.getIdentificationCandidateList();29 if(candidates.size()>0){30 IIdentificationCandidate candidate = candidates.get(0);31 UUID userUUID = candidate.getUuid();32 long candidateScore = candidate.getScore();33 }3435 }3637 @Override38 public void onError (Exception e) {39 // An error has occurred40 }41});
Function
An example snippet is shown.
Java1void identify(IIdentificationOptions identificationOptions, IBiometricCandidate biometricCandidate, List<IBiometricReference> biometricReferences, BioMatcherAsyncCallbacks<IIdentificationResult> callbacks);
Parameter | Description |
|---|---|
identificationOptions IIdentificationOptions | The options used to perform the identification |
biometricCandidate IBiometricCandidate | Contains the list of templates that you want to match |
biometricReferences List<IBiometricReference> | Contains the list of references against you will identify your candidate—check IBiometricReference |
callbacks BioMatcherAsyncCallbacks | Callbacks to be executed depending on the result—check IIdentificationResult |
Errors
You will receive an exception reporting the error.
Identify synchronous
This method can be used to identify users.
It identifies the user from the list of candidate templates that are matched against a list of reference templates.
Note: This function must be executed in a different thread than UI. Check the use case named Identify.
An example snippet is shown.
Java1//Identification options2IIdentificationOptions identificationOptions = new IdentificationOptions();34//Biometric candidate5IBiometricCandidate biometricCandidate = new BiometricCandidate(BiometricModality.FACE);6//We add all the templates for this candidate7biometricCandidate.addTemplates(candidates);89//We create the list of references10ArrayList<IBiometricReference> biometricReferences = new ArrayList<IBiometricReference>();11//Biometric reference for one user12IBiometricReference biometricReference = new BiometricReference(user.getUuid(), BiometricModality.FACE);13//We add all the templates for this user14biometricReference.addTemplates(references);1516//We add the user to the list17biometricReferences.add(biometricReference);1819IIdentificationResult result = matcherHandler.identify(identificationOptions, biometricCandidate, biometricReferences)20//The identification result21List<IIdentificationCandidate> candidates = result.getIdentificationCandidateList();22if (candidates.size() > 0) {23 IIdentificationCandidate candidate = candidates.get(0);24 UUID userUUID = candidate.getUuid();25 long candidateScore = candidate.getScore();26}
Function
An example snippet is shown.
Java1IIdentificationResult identify(IIdentificationOptions identificationOptions, IBiometricCandidate biometricCandidate, List<IBiometricReference> biometricReferences);
Parameter | Description |
|---|---|
| identificationOptions IIdentificationOptions | The options used to perform the identification. |
| biometricCandidate IBiometricCandidate | Contains the list of templates that you want to match. |
biometricReferences List<IBiometricReference> | Contains the list of references against which you will identify your candidate; refer to IBiometricReference |
Errors
You will receive an exception reporting the error.
Detect biometrics
This allows you to detect the biometrics in a MorphoImage.
This function extracts all the biometric templates contained in an image (such as, all the faces that are in an image).
Note: Check the use case named Detect Biometric.
Java1//Create a populate options2 IDetectBiometricOptions detectBiometricsOptions = new DetectBiometricsOptions();3 detectBiometricsOptions.setBiometricLocation(BiometricLocation.FACE_FRONTAL);4 detectBiometricsOptions.setBiometricModality(BiometricModality.FACE);56 bioMatcherHandler.detectBiometric(detectBiometricsOptions, image, new BioMatcherAsyncCallbacks<List<IMorphoTemplate>>() {7 @Override8 public void onPreExecute() {9 // Optional hook on the builtin Android AsyncTask callback `onPreExecute`10 }1112 @Override13 public void onSuccess(List<IMorphoTemplate> result) {14 //A List of templates extracted from the image15 }1617 @Override18 public void onError(Exception e) {19 // An error has occurred20 }21 });
Function
An example snippet is shown.
Java1public void detectBiometric(final IDetectBiometricOptions detectBiometricsOptions, final IImage image, BioMatcherAsyncCallbacks<List<IMorphoTemplate>> callbacks)
Parameter | Description |
|---|---|
| detectBiometricsOptions IDetectBiometricOptions | The options used during the detection process. |
| image IImage | The image. |
| callbacks BioMatcherAsyncCallbacks | Callbacks to be executed depending on the result. |
Errors
You will receive an exception reporting the error.
Detect biometric synchronous
This allows you to detect the biometrics in a MorphoImage.
This function extracts all the biometric templates contained in an image (such as, all the faces that are in an image).
Note: This function must be executed in a different thread than the UI. Check the use case named Detect Biometric.
An example snippet is shown.
Java1/Create a populate options2IDetectBiometricOptions detectBiometricsOptions = new DetectBiometricsOptions();3detectBiometricsOptions.setBiometricLocation(BiometricLocation.FACE_FRONTAL);4detectBiometricsOptions.setBiometricModality(BiometricModality.FACE);56List<IMorphoTemplate> templates = bioMatcherHandler.detectBiometric(detectBiometricsOptions, image)7/A List of templates extracted from the image
Function
An example snippet is shown.
Java1public List<IMorphoTemplate> detectBiometric(final IDetectBiometricOptions detectBiometricsOptions, final IImage image)
Parameter | Description |
|---|---|
| detectBiometricsOptions IDetectBiometricOptions | The options to use during the detection process. |
| image IImage | The image. |
Errors
You will receive an exception reporting the error.
Destroy
This releases all the handler resources as shown in the snippet:
Java1handler.destroy();
Creating a BioMatcher Handler
This allows you to retrieve a handler to perform all the matching, identifying, and template coding operations.
-
Review the use cases named Create BioMatcherHandler.
-
Review the features provided by this handler here.
Java1IBioMatcherSettings bioMatcherSettings = new BioMatcherSettings();2 bioMatcherSettings.setLogLevel(LogLevel.DISABLE);3 bioMatcherSettings.setDumpFileEnable(false);4 bioMatcherSettings.setDumpFileFolder(null);5 //To configure finger print template format6 bioMatcherSettings.setFingerprintTemplate(MorphoFingerTemplateFormat.PKCOMPV2);7 BioSdk.createBioMatcherHandler(this, bioMatcherSettings, new BioMatcherAsyncCallbacks<IBioMatcherHandler>() {8 @Override9 public void onPreExecute() {10 // Optional hook on the builtin Android AsyncTask call-back `onPreExecute`11 }1213 @Override14 public void onSuccess(IBioMatcherHandler result) {15 // Indicates that initialization succeeded. The returned handler can be used to perform the matching and identify operations.16 }1718 @Override19 public void onError(Exception e) {20 // An error has occurred.21 }22 });
Parameter | Description |
|---|---|
| context Context | The Android context. |
| settings IBioMatcherSettings | The settings to configure the matcher. |
| callbacks BioMatcherAsyncCallbacks | Callbacks to be executed depending on the result. |
Errors
You will receive an exception reporting the error.
Enums
ColorSpace
This is the colorspace enum.
Attribute | Description |
|---|---|
Y8 | Grayscale 8bpp image. |
Y16LE | Grayscale 16bpp image (Little Endian). |
BGR24 | Colour 24bpp BGR image (BMP like memory layout). |
RGB24 | Colour 24bpp RGB image (reversed memory layout compared to RT_COLORSPACE_BGR24). |
Camera
This is the enum used to configure the camera for the capture.
Attribute | Description |
|---|---|
FRONT | Front camera |
REAR | Rear camera |
CameraFlash enum
This enum is used to configure the camera flash of the capture.
Attribute | Description |
|---|---|
OFF | Camera flash off |
ON | Camera flash on |
Overlay
This is the enum used to configure the overlay for the capture.
Attribute | Description |
|---|---|
OFF | Overlay off |
ON | Overlay on |
LogLevel
This enum controls the log level.
Attribute | Description |
|---|---|
ERROR | Error log level or above |
DEBUG | Debug log level or above |
WARNING | Warning log level or above |
INFO | Info log level or above |
DISABLE | Disables logs |
CaptureHandlerStatus enum
This enum retrieves the status of the capture handler.
Attribute | Description |
|---|---|
STOP | The handler is stopped. |
PREVIEW | The handler is in preview mode. |
CAPTURE | The handler is in capture mode. |
BioCaptureHandlerError
This enums gives information why msc async failed
Attribute | Description |
|---|---|
MSC_ERR_PARAMETERS | Parameters are invalid. |
MSC_ERR_PARAMETER_UNKNOWN | Parameter is missing |
MSC_ERR_MEMALLOC | Memory allocation issue |
MSC_ERR_INIT | Initialization failed |
MSC_ERR_GRAPH_INITIALISATION_FAILED | the graph initialization failed |
MSC_ERR_PARAMETER_NOT_FOUND | Parameter is missing |
MSC_ERR_PARAMETER_SIZE | Parameter size is incorrect |
MSC_ERR_TYPE_MISMATCH | MSC type mismatch |
MSC_ERR_INVALID_HANDLE | Handle is invalid |
MSC_ERR_LICENSE | License is invalid |
MSC_ERR_APPLINOTAVAILABLE | the application parameter is not available |
MSC_ERR_PROFILENOTAVAILABLE | MSC profile is not available |
NOT_EXECUTED | Java is unable to execute |
LIBS_NOT_FOUND | Java libraries are not found |
NO_CONTEXT_SET | Java context is not set |
MSC_ERR_SUBPROFILENOTAVAILABLE | MSC sub-profile is not available |
MSC_ERR_UNKNOWN | An unknown error occurred |
MSC_ERR_INVALID_OPERATION | The operation is invalid |
MSC_ERR_INCOMPATIBLE_API_VERSION | The API version is incompatible, your application must be recompiled |
MSC_ERR_PARAMETER_WRONG_TYPE | Parameter is not the right type |
MSC_ERR_PARAMETER_NOT_SET | Parameter is not set in current scope |
UNKNOWN | Unknown error |
FaceLiveness enum
This enum describes liveness verification mode.
Attribute | Description |
|---|---|
NO_LIVENESS | No liveness detection is performed during capture. |
ACTIVE | Triggers a more complex challenge to detect liveness. |
PASSIVE | Liveness is detected without a user challenge—the user is unaware that liveness detection is being employed. |
PASSIVE_VIDEO | Face is detected without any challenge and effort by the user. Liveness detection is done on server side. Works only with RemoteCaptureHandler(DEPRECATED) and RemoteLiveness |
FaceLivenessSecurityLevel enum
Security level for face liveness capture. Defines how restrictive the liveness verification will be. The higher the level is set, the more restrictive the verification will be.
Attribute | Description |
|---|---|
LOW | |
MEDIUM | |
HIGH | Recommended level |
FaceLivenessResult enum
This enum represents the result of a face liveness check.
Attribute | Description |
|---|---|
UNKNOWN | Unable to define or liveness is turned off |
LIVE | Liveness success - a living person is detected |
FAKE | Liveness check failure - not a living person |
NO_DECISION | WebBioServer is needed to make a decision |
FaceCaptureInfo enum
Attribute | Description |
|---|---|
INFO_GET_OUT_FIELD | User must move out of the camera field |
INFO_COME_BACK_FIELD | User must move back into the camera field |
INFO_TURN_LEFT | User must turn head left |
INFO_TURN_RIGHT | User must turn head right |
INFO_CENTER_TURN_LEFT | User must face center but turn head left |
INFO_CENTER_TURN_RIGHT | User must face center but turn head right |
INFO_CENTER_ROTATE_DOWN | User must face center but rotate head down |
INFO_CENTER_ROTATE_UP | User must face center but rotate head up |
INFO_CENTER_TILT_LEFT | User must face center but tilt head left |
INFO_CENTER_TILT_RIGHT | User must face center but tilt head right |
INFO_CENTER_MOVE_FORWARDS | User must move forwards |
INFO_CENTER_MOVE_BACKWARDS | User must move backwards |
INFO_CENTER_LOOK_FRONT_OF_CAMERA | User must look in front of the camera |
INFO_CENTER_LOOK_CAMERA_WITH_LESS_MOVEMENT | User must look at the camera with less movement |
INFO_TURN_LEFTRIGHT | User must turn left, then right or right, then left |
INFO_TURN_DOWN | User must turn head down |
INFO_TOO_FAST | User is moving his/her head too fast |
INFO_NOT_MOVING | Face movement not detected |
DEVICE_MOVEMENT_ROTATION | Smartphone movement detected (the user is moving his/her smartphone and not his/her face) |
BiometricLocation enum
Attribute | Description |
|---|---|
FACE_FRONTAL | Face |
FINGER_RIGHT_INDEX | Right index finger |
FINGER_RIGHT_MIDDLE | Right middle finger |
FINGER_RIGHT_RING | Right ring finger |
FINGER_RIGHT_LITTLE | Right little finger |
FINGER_RIGHT_THUMB | Right thumb |
FINGER_RIGHT_FOUR | Right four fingers |
FINGER_LEFT_INDEX | Left index finger |
FINGER_LEFT_MIDDLE | Left middle finger |
FINGER_LEFT_RING | Left ring finger |
FINGER_LEFT_LITTLE | Left little finger |
FINGER_LEFT_THUMB | Left thumb |
FINGER_LEFT_FOUR | Left four fingers |
FINGER_UNKNOWN | Unknown finger |
HAND_LEFT | Left hand |
HAND_RIGHT | Right hand |
HAND_UNKNOWN | Unknown hand |
UNKNOWN | Unknown |
BiometricModality enum
Attribute | Description |
|---|---|
UNKNOWN | Unknown |
FACE | Face |
FRICTION_RIDGE | Friction ridge (fingers) |
Cr2dMode enum
Attribute | Description |
|---|---|
RANDOM | Targets fully random |
PATH | Targets defined with path |
FIXED | Fixed position for target |
MorphoFaceTemplateFormat enum
This enum retrieves information about the face template format.
Attribute | Description |
|---|---|
MIMA | MIMA format |
MOC | MOC format |
FaceTemplateQuality enum
This enum retrieves information about quality of the face saved in template.
Attribute | Description |
|---|---|
LOW | The quality of face is low (not recommended to perform matching). |
MEDIUM | The quality of face is medium - good enough to perform matching. |
HIGH | The quality of face is high. |
CaptureError enum
This enum reports the reason that a capture attempt failed.
Attribute | Description |
|---|---|
UNKNOWN | Unknown error |
LOW_RESOLUTION | Resolution too low |
NOT_ENOUGH_MOVEMENT | Not enough movement |
TOO_FAST | Too fast |
HINT_UNKNOWN | Hint value is unknown |
CAPTURE_TIMEOUT | Capture timeout |
CAPTURE_DELAYED | Capture delayed due to liveness failures |
BAD_CAPTURE | Capture went wrong |
BAD_CAPTURE_FINGERS | Capture of the fingers went wrong |
BAD_CAPTURE_FACE | Capture of the face went wrong |
BAD_CAPTURE_HAND | Capture of the hand went wrong |
LIVENESS_CHECK | Liveness check failed |
AuthenticationStatus enum
This enum contains the authentication status.
Attribute | Description |
|---|---|
SUCCESS | Authentication success (above the threshold used for the authentication process) |
FAILURE | Authentication failure (below the threshold used for the authentication process) |
LogLevel enum
This enum controls the logging level.
Attribute | Description |
|---|---|
ERROR | Error log level or above |
DEBUG | Debug log level or above |
WARNING | Warning log level or above |
INFO | Info log level or above |
DISABLE | Disables logging |
Example code
Kotlin1val IMAGE_SIZE = 4002val JPEG_COMPRESSION_LEVEL = 9034private fun prepareImage(image: ByteArray): ByteArray {5 val imageBitmap = BitmapFactory.decodeByteArray(image, 0, image.size)6 val scaledBitmap = Bitmap.createScaledBitmap(imageBitmap, IMAGE_SIZE, IMAGE_SIZE, true)7 imageBitmap.recycle()8 val byteArrayOutStream = ByteArrayOutputStream()9 val result = scaledBitmap.compress(Bitmap.CompressFormat.JPEG, JPEG_COMPRESSION_LEVEL, byteArrayOutStream)10 scaledBitmap.recycle()11 return byteArrayOutStream.toByteArray()12}